Once you have finished Part 1: Calculating Expenses, you can move on to creating a realistic budget.
Look at all your expenses. Start with what can't be changed - your rent / mortgage, debt payments, student loans, childcare costs, etc. Write down all your fixed expenses and tally them up. How much do you have left to work with?
Now look at semi-fixed expenses - utilities may vary a bit, but are they generally about the same each month? Phone, internet, cable, insurance - things that could be lowered just a bit. Can you get on a steady payment plan with your electric company where you pay an average (fixed) amount each month? Can your cell phone plan be changed to lower your bill? Do you really watch all those channels, or can you reduce your cable package? When was the last time you checked your insurance rates? Simply making a few phone calls or checking around online can reduce these expenses quite a bit.
Now comes the harder expenses. First, we will look at monthly variable expenses, then we'll explore those not-so-regular expenses, like gifts, that still come up, just not every month.
Monthly expenses. Food is often the biggest surprise when starting a budget. It's easy to spend more than expected at the grocery store, go out to eat a little more than planned, make those unexpected trips to the market and end up with a few extra things. Really analyze how much you spend in this category. Can you reduce how often you eat out? Can you buy less convenience foods? Could you plan out your meals better and buy only what you need? There are countless ways to save on groceries, from sales to coupons to meal planning. Set a reasonable goal and try to reduce it a bit each week. If you try to drastically change it all at once, you will surely fail. Start by trimming down $50 or even $25 each week and work your way up. Consider your schedule when doing this. If you know you have back to back soccer games on Saturdays or you always eat with the family after church, include that in your budget and planning. Food may be one of the most challenging areas, but it's also one of the easiest places to shave off a few dollars.
Other monthly expenses you could cut back on with little effort are fuel (plan your trips better, carpool, etc), babysitting (reduce how often you go out alone or consider taking the kids with you), entertainment (look for cheaper alternatives, have a movie night at home, check for coupons), and personal hygiene / grooming ( go a week longer between haircuts, try an at-home trim or dye, use coupons for products you buy regularly, make your own products at home). There are countless ways to trim a few dollars here and there, which can make a big difference overall.
Now for those irregular but inevitable expenses. Consider how much you spend at Christmas time (and how broke you are in January!). What if instead you put aside $25 every month, so when December rolls around you already have the cash. And if you set aside $20 every month for other gifts (and let it roll over each month it's not used), then Mother's Day, Father's Day, Valentine's Day, Easter, Anniversaries, and Birthdays won't be so hard on your budget. Car repairs and maintenance- you know you're going to need it, why not plan for it? If you budgeted for $30 a month for car maintenance, then when you need that new wiper blade, oil change, or brakes, you've already got the cash. The key here is to plan. You know they will eventually happen, even if it's not every month. Look at your expense list again, and pick out all the irregular expenses (clothing, gifts, repairs, home maintenance, school supplies, club dues, sporting equipment and fees, etc). You can combine some or keep them all separate and give them a line in the budget each month.
If you set up a Mint account in Part 1, it will help you with this part. You can create a budget category for every expense, and it gives you the option to rollover any unused portion - like for gifts and maintenance. Then you can easily see at any time how much you've spent in each category.
Go line by line and see if you can reduce each expense, even if it is only by a few dollars. Remember, every little bit helps and they can add up to a big difference. Make sure every expense you listed has a place in the budget, and make sure it is realistic for your family. If you've been spending $300 a month eating out, cutting it out completely won't work. Reduce it to $150, then when you are comfortable with that, cut back a little more. Every budget is a work in process and it's okay to tweak it each month. Be sure to include savings in your budget - both long and short term (eg: retirement and emergency fund), so life's little mishaps don't catch you off guard.

In Part 3 we will go over how to stick to the budget. Right now, just focus on creating a budget that works for you. No two budgets will be alike, you have to figure out what works best for your family. If you have athletic children, you'll probably spend more on sports equipment. If you are an artsy family, craft supplies may be a larger expense. The main points to remember are to account for every expense, and reduce everything you can.
Showing posts with label kids. Show all posts
Tuesday, June 30, 2015
Monday, June 29, 2015
Budgets Part 1: Calculating Expenses
I am about to get really personal with you. Budgets tend to be a taboo subject, but they shouldn't be. Perhaps if we were all more open to talking about budgets and finances, people wouldn't be in so much debt.
I'm going to show you my method of creating a budget, and tips for sticking to it.
The first step- write it all down! Not just bills that you pay every month, but every expense you have. Don't worry about numbers right now, just write down everything you spend money on during the month. For example:
Rent / Mortgage
Homeowners / Renters Insurance
Electricity
Water
Sewer
Gas
Cable
Internet
Cell Phone
Car Payment
Car Insurance
Health Insurance
Groceries
Eating Out
Credit Card Payments
Childcare
Babysitters
Children's Allowance
Church Tithings / Offerings
Cigarettes
Alcohol
School Supplies
Clothing
Household Items
Laundry Expenses
Home Maintenance
Retirement Accounts
College Savings
Student Loans
Shopping
Children's Needs
Haircuts
Personal Hygiene / Grooming
Pet Expenses
Emergency Savings
Entertainment
Club Dues
School Expenses
Gifts
Charity / Donations
If you've spent money on it in the last 90 days, write it down. I'm sure you will forget something, and that's okay. This is just a starting point.
Next Step- List your net income. If you have a variable income, take an average of the last three months and use that. We will discuss later how to handle a budget with variable income.
Now comes the fun part- finding out how much you really spend on each item. Most people are genuinely surprised by the results and grossly underestimate how much they spend every month. There are a few ways to do this. You can go back through bank and credit card statements for the past 90 days and write down / tally each expense. This can be cumbersome if you have multiple accounts, but is the best way to get an accurate total. If you would like a slightly simpler approach, I suggest using Mint. You can use it from your computer or download the app to any smart phone or tablet. I use the website when I'm at home, but have the app on my tablet for when I'm out and want to track a purchase. The first time you use it will take a few extra minutes as you set it up, but it is well worth the time and energy. I have used Mint for years and it is the best budget tool for starting out and staying on track. You will set up your account, and link all your bank and credit card accounts. I promise, it's secure, and you don't have to type in all the account numbers. Mint will automatically track and categorize every purchase you make. You can set up budgets, savings goals, and track debt payoff too. For now, you just want to track your expenses.
Feeling nervous? Realizing how much you actually spent on food last month? It can be very eye-opening to see everything in one place, but you can't fix a problem if you don't know what it is.
Now you need to combine everything. You can use a spreadsheet, computer program, or good ole pen and paper. I prefer to write it all out by hand, it ensures I don't miss anything and really makes it sink in. Take your list of expenses you created earlier, and add the amount spent. If you find an expense you forgot about, just add it to the list. Be honest with yourself, or this will never work. Don't try to fudge the numbers, don't brush it off as "a one time expense"- if you spent money on it, write it down. This budget is just between you and your partner, there is no need to lie or be embarrassed. I can't guarantee an argument won't ensue over how much you spent on groceries or how much he ate out at work last week. But I can promise you it will all be worth it in the end.
Tally up all your income, and deduct all your expenses. Are you in the hole, just barely breaking even, or are you the rare bird with plenty of money left at the end of the month? Did you rely on credit cards to make purchases? Right now we are only focused on getting everything out in the open- don't stress over how to fix it just yet. Knowledge is power, and you need to know everything before you can move on. Take some time to get everything together, include every expense, and talk with your partner about it. If there were cash withdrawals, be sure to account for where that money went as well. Once you have everything ready, you can move on to setting up a realistic budget.
Part 2: Setting Up A Realistic Budget
Wednesday, June 24, 2015
Signs Your Child May Be Sick
As
parents, we are always looking out for our kids. When they don't feel
well, the signs are usually obvious. Fever, stomach ache, and crying are
dead giveaways that something isn't quite right. But what about those
little hints that only the keen eyes of parenthood can see?
Here are my Top Six Signs My Children Are Sick
Sunday, June 21, 2015
The Mom Next Door Said "Freakin"
I'm a young mom. I had my third child just after my 21st birthday. Because of my age, I tend to doubt my parenting abilities. I know I've made plenty of mistakes, and thanks to a combination of DNA and my inability to cope with normal situations, I'm fairly certain my children will need massive amounts of therapy later in life. But I do my best, I try to follow my heart and go with my instincts. Still, some days it just doesn't feel enough.
I see all these other moms who have it all together. Their children are well behaved, always nicely dressed, and their house is forever spotless. I gave up long ago trying to be that perfect mother, it's just not going to happen. But it doesn't stop me from wondering how they mange to do it. My neighbor is a prime example of this. She has twins about my oldest son's age, and an adorable 3 year old. They are so well behaved! The first week we moved here, the oldest boy came over and introduced himself, then asked if my son could come play. He had impeccable manners, and I just couldn't get over it. The 3 year old will play outside and never cross the invisible line of his property. They have several dogs and a busy lifestyle and their house is where all the neighborhood children seem to flock to. I watch in awe from my front porch as this mother handles it all so gracefully.
Why can't that be me?
So today, I sneaked out to the porch for a little quiet time. I could hear my children inside arguing, playing, doing anything but the chores they were assigned. I watched this mother across the street as she cleaned out her garage. She was purging everything in sight, the kids were helping, the dogs were quietly watching. I envied her. I have a hard time purging, and an even harder time getting my family to help. And I can't think of a single time my dog has ever sat outside, quietly observing the action.
Then it happened. She sent her son in for a marker as she continued to work. He came back several times asking where to look, what kind she wanted, why did he have to do it....he was sounding more and more like my own children. Clearly, she had enough of it.
"Just bring me a freakin marker!" she shouted from the driveway. My jaw hit the floor. This perfect mother whom I had admired from a distance for the past three years suddenly sounded just like me! She became frustrated at her child and she lost it for a moment! It was the most glorious thing I'd ever witnessed!
Perhaps she wasn't the perfect mother I thought she was. Perhaps she was just just like the rest of us, doing her best and occasionally losing it a bit. Perhaps I wasn't alone. Perhaps we are all battling this job of motherhood the only way we know how.
She went back to work, laughing with her children, none the wiser of my silent revelation across the street. But I felt a weight lifted off my shoulders. The weight of all those perfect TV moms. The weight of a permanently clean house. The weight of perfect children.
I don't know about you, but I think my children are pretty darn perfect just the way they are. And at the end of the day, it doesn't matter if I dusted the ceiling fans or washed all the windows. What my children will remember is what we played together, how we laughed together, and the time spent cuddling together. I don't have to always have it together. My children are happy, healthy, well fed and cared for. And above all else, they are loved more than they will ever know.
So thank you, neighbor lady, for yelling "freakin" in a moment of weakness. It made my failures and moments of weakness seem so much more normal.
Do you ever feel like the worst mom ever? Do you envy those moms who have it all together? Could you possibly BE one of those moms? Or are you just another unperfect family like the rest of us?
Sunday, March 15, 2015
Cupcake Cones And Cake Balls
Baking with your children can be both fun and creative. A fun way to satisfy your creativity and your child's sweet tooth is to bake Cupcake Cones. The recipe is simple, and you can decorate any way you like. Great for bake sales, family events, or just a rainy day at home.
What you'll need:
Aluminum foil
Ice cream cones
Cake mix
Muffin/Cupcake tray
Frosting
Sprinkles
The recipe:
Buy your favorite cake mix and prepare according to package directions. Wrap the ice cream cones in aluminum foil and fill 2/3 full with batter. Set the cones in the muffin tray. Depending on the size of your tray or balance skills, you may need to add more foil around the sides of the cones to keep them from falling over.
Bake according to package directions and let cool. Decorate as much as you like. If you want to get the "ice cream cone" look, you can use decorator's frosting with a wide tip and swirl around the top. You can also use any can of whipped frosting and swirl with a spoon. Top with sprinkles, cookie crumbs or candies.
Another fun recipe is cake balls. For this, you will need:
Cake Mix
Vanilla Frosting
Lollipop sticks
Powdered Sugar
The recipe:
Again, buy your favorite cake mix and bake according to package directions. Allow to cool for at least an hour. Once cooled, crumble the cake in a large bowl with your hands. Don't be afraid to get a little messy! Add 1/2 can of vanilla frosting to the bowl, and mix with your hands. If it seems too dry, add more frosting.
Roll the mix into 1-in balls, approximately 25. Place the balls on wax paper and insert the lollipop stick.
To make the icing:
Mix 4 Tbs. of water with 2 cups powdered sugar. Stir until smooth. You may add cocoa powder for a chocolate flavor.
Dip the balls into the icing and return to the wax paper. Add sprinkles, mini candies, or cookie crumbs if you wish. Allow to dry so the icing will harden. If transporting the balls, wrap in plastic wrap and secure with a ribbon for your very own cake lollipops!
What you'll need:
Aluminum foil
Ice cream cones
Cake mix
Muffin/Cupcake tray
Frosting
Sprinkles
The recipe:
Buy your favorite cake mix and prepare according to package directions. Wrap the ice cream cones in aluminum foil and fill 2/3 full with batter. Set the cones in the muffin tray. Depending on the size of your tray or balance skills, you may need to add more foil around the sides of the cones to keep them from falling over.
Bake according to package directions and let cool. Decorate as much as you like. If you want to get the "ice cream cone" look, you can use decorator's frosting with a wide tip and swirl around the top. You can also use any can of whipped frosting and swirl with a spoon. Top with sprinkles, cookie crumbs or candies.
Another fun recipe is cake balls. For this, you will need:
Cake Mix
Vanilla Frosting
Lollipop sticks
Powdered Sugar
The recipe:
Again, buy your favorite cake mix and bake according to package directions. Allow to cool for at least an hour. Once cooled, crumble the cake in a large bowl with your hands. Don't be afraid to get a little messy! Add 1/2 can of vanilla frosting to the bowl, and mix with your hands. If it seems too dry, add more frosting.
Roll the mix into 1-in balls, approximately 25. Place the balls on wax paper and insert the lollipop stick.
To make the icing:
Mix 4 Tbs. of water with 2 cups powdered sugar. Stir until smooth. You may add cocoa powder for a chocolate flavor.
Dip the balls into the icing and return to the wax paper. Add sprinkles, mini candies, or cookie crumbs if you wish. Allow to dry so the icing will harden. If transporting the balls, wrap in plastic wrap and secure with a ribbon for your very own cake lollipops!
Sunday, March 8, 2015
How To Get Organized
How To: Get Organized
Getting organized is a challenge everyone faces from day to day. Whether it be organizing your house, your closet, your office- something is always in need of a little help. I have been tackling the task of organizing my house, and it's been a long process. I've gathered some tips that may help you get organized once and for all.
Tip #1 - Assess your space. Do you share a closet or are you blessed with a walk-in all your own? Do you have shoes laying all over the floor with no home, or hundreds of empty hangers with clothes scattered around the room? Once you know what the problem is you are better equipped to fix it. If you have an undying love of shoes, invest in a sturdy shoe rack large enough to hold your current stash, with room to grow for your next great find. If you have thousands of t-shirts and only three nice blouses, a hanging organizer may better suit your needs. If you keep all accessories, such as belts, scarves, handbags and jewelry in your closet, consider building a shelf for the handbags, and hanging hooks for belts and scarves. Once you have a basic plan laid out, you can pay more attention to details. Do you want your clothes sorted by season, or perhaps colors? Do you plan in entire outfits or separate pant from tops? If you like to plan in terms of outfits, a few pant hangers will do wonders for your morning routine. Pair the top and pants together, and just grab-and-go in the morning. If you have a varying work schedule, you may want to plan according to the day. You can find closet rod organizers at any mass retailer. See how to make your own simple closet dividers.
If Friday is "Jeans Day" at work, put your favorite pair behind the Friday tag. If you know you have an interview on Tuesday, place your suit behind the Tuesday tag. Whatever system you choose, make sure it works for you. If you know you won't sort through colors when putting laundry away, a color-coded closet won't stay neat for long. If you like to options, chances are a weekly plan of outfits will fall through. See how we organize outfits for the week here.
Tip # 2- Take it all out! Once you've decided on a system and bought the necessary supplies, take everything out of the closet. Things are going to get a lot worse before they get better.
Take this opportunity to go through your clothes. If you haven't worn it in a year, get rid of it. I make 3 piles, with three labeled bins. Charity, Trash, Keep. If it's in decent shape, but you just don't love it, put it in the charity bin. There's no need to keep things you won't wear, it's only taking up space. That holey pair of underwear, on the other hand, can go straight into the trash. Only put back in your closet what you know you will wear. If it doesn't fit, and hasn't for a while, toss it.
You don't need a daily reminder of any weight lost or gained. The only things that should be in your closet are clothes you fit and love. Donate everything else (except for those underwear!)
Tip #3- Have your organization system installed before you put anything away. Don't hang up all the clothes then attempt to rearrange the outfits. It will only stress you out and cause more work. Once your system, whether it be daily outfits, types of clothing, or business/casual wear is in place- you're ready to put it all back.
Tip #4- Re-assess. Once everything is put away, take another long look at your closet. Is everything easy to reach? Do you like the organization system and can keep it up? Be proud of your work. You have just tackled the black hole of bedrooms, and streamlined your morning routine.
This was a daily issue at my house. It took three times as long to get the kids ready. Digging through drawers to find clothes that fit, rummaging through the toy box for a lost shoe, and, my personal favorite, tearing a room apart to find the lost sippy cup or teddy bear. I needed the space to be workable. My kids needed to be able to find their socks and shoes, have a place for all the toys, and for me not to stub my toe every night at bedtime. Here's how we handle shoes.
The task seemed daunting, and as much as I wanted it done, I continued putting it off. Where should I start? How can I make the most of my space? I made countless drawings of room layouts, toy box placement, and clothing arrangement. I finally devised a plan, and got it all done in a few short hours. The first step was to once again, remove everything. I pulled all the furniture, toys, and clothes out of the room. I needed to start from scratch. The dressers were the easy part. I went to the dollar store and picked up several clear plastic bins.
I designated two drawers to hold all the socks, shoes, underwear, burp rags, bibs and hats. Each bin was labeled and placed in the drawer. I began sorting the mountain of clothes. I had a different bin for each child's socks, all bibs and hats were in one bin, and my burp cloths were neatly folded and easily accessible. It was a dream come true. No more searching for matching socks in the right size. That would cut 10 minutes from day right there!
Then came the toys. I went through all the toy boxes, throwing away anything broken and donating anything the kids didn't play with anymore. You'd be surprised how many toys kids have! All the cheap kids meal toys-gone. Those stuffed animals from three years ago? Gone. I reduced it from 3 toy boxes to 1. This alone would cut clean up time in half. Then it was time for the rest of the clothes. If it didn't fit it went in the donation bin. I had a drawer for pajamas, a drawer for pants/shorts, a drawer for shirts/dresses, and the bottom drawer was things that were still too big but would fit soon. This made my life a lot easier. On to the furniture. All bedding was washed and carefully re-assembled into the masterpiece pictured on the original packaging. I knew it wouldn't stay that way long, but it looked so much better.All furniture was wiped down with disinfecting wipes. I has a small set of plastic drawers on top of the dressers. This held lotions, diaper creams, thermometers, hair bows, and band-aids for easy access. No more hunting down a matching bow or scrambling for a band-aid with a screaming child. My life was getting better by the second. A few decorative pictures and strategically placed stuffed animal and voila! A new clean room for the kids.
You can see our updated toy storage here.
This is where things got tricky. I had to make sure everything was withing my reach, but all cleaning supplies and medicines were safely tucked away. I went back to the dollar store for more bins. This time I opted for mesh and plastic bins with holes. I needed a way to store the bath products and a bin that could still get air, to avoid mold. I got bright colors to match the decor. The first bin held all 600 bottles (or so it seemed) of bubble bath, foam soap, shampoo and shaving creams. The second bin was for bath toys and sponges. We seem to have a growing collection of these. Having them all in one place made bath time easier. The kids could each pick out a toy, or I could dump the entire contents in the tub. After the bath, they would help put them back in the bin and make clean up easier.
Next up was the cabinet space. In our bathroom, we had only a small medicine cabinet behind the mirror. Simply not enough space for a family of five. We got a tall, thin set of Rubbermaid drawers to go next to the sink. Again, safety was the top priority. All razors, medications and other sharp objects went in the highest drawer. In the middle went the hairdryer and other appliances. The bottom drawers were make-up (not what I want the kids playing with, but at least it wouldn't hurt them) and extra soaps, toothpaste/toothbrushes, and hair brushes. On the top "shelf" we had a cup that held everyone's toothbrush and the bottle of toothpaste. We like to have these sitting out as a constant reminder for good oral hygiene. All surfaces were wiped with disinfecting wipes and a few candles made it an inviting space. Everything had a place, and we all knew where to find it. This made mornings and bedtimes slightly easier. As long as you have 5 people and 1 sink, things are always going to be a little crazy.
It make take a day of work, but organizing your house is well worth it. Think about how much time you waste now looking for things and scrambling to get it all together in the morning. Once you've learned the basic steps, you can apply them to any space. Assess the needs of the space, devise a plan and organization system, pull it all out, then only put back what is needed. You can have your home cleaned up and working like it should in no time!
Getting organized is a challenge everyone faces from day to day. Whether it be organizing your house, your closet, your office- something is always in need of a little help. I have been tackling the task of organizing my house, and it's been a long process. I've gathered some tips that may help you get organized once and for all.
Organizing The Closet
This has always been my biggest challenge. I can never find what I am looking for, and often arrive late and disheveled after a frantic search to find the right outfit. I have since re-configured my closet to better suit my needs.Tip #1 - Assess your space. Do you share a closet or are you blessed with a walk-in all your own? Do you have shoes laying all over the floor with no home, or hundreds of empty hangers with clothes scattered around the room? Once you know what the problem is you are better equipped to fix it. If you have an undying love of shoes, invest in a sturdy shoe rack large enough to hold your current stash, with room to grow for your next great find. If you have thousands of t-shirts and only three nice blouses, a hanging organizer may better suit your needs. If you keep all accessories, such as belts, scarves, handbags and jewelry in your closet, consider building a shelf for the handbags, and hanging hooks for belts and scarves. Once you have a basic plan laid out, you can pay more attention to details. Do you want your clothes sorted by season, or perhaps colors? Do you plan in entire outfits or separate pant from tops? If you like to plan in terms of outfits, a few pant hangers will do wonders for your morning routine. Pair the top and pants together, and just grab-and-go in the morning. If you have a varying work schedule, you may want to plan according to the day. You can find closet rod organizers at any mass retailer. See how to make your own simple closet dividers.
If Friday is "Jeans Day" at work, put your favorite pair behind the Friday tag. If you know you have an interview on Tuesday, place your suit behind the Tuesday tag. Whatever system you choose, make sure it works for you. If you know you won't sort through colors when putting laundry away, a color-coded closet won't stay neat for long. If you like to options, chances are a weekly plan of outfits will fall through. See how we organize outfits for the week here. Tip # 2- Take it all out! Once you've decided on a system and bought the necessary supplies, take everything out of the closet. Things are going to get a lot worse before they get better.
Take this opportunity to go through your clothes. If you haven't worn it in a year, get rid of it. I make 3 piles, with three labeled bins. Charity, Trash, Keep. If it's in decent shape, but you just don't love it, put it in the charity bin. There's no need to keep things you won't wear, it's only taking up space. That holey pair of underwear, on the other hand, can go straight into the trash. Only put back in your closet what you know you will wear. If it doesn't fit, and hasn't for a while, toss it.
You don't need a daily reminder of any weight lost or gained. The only things that should be in your closet are clothes you fit and love. Donate everything else (except for those underwear!)
Tip #3- Have your organization system installed before you put anything away. Don't hang up all the clothes then attempt to rearrange the outfits. It will only stress you out and cause more work. Once your system, whether it be daily outfits, types of clothing, or business/casual wear is in place- you're ready to put it all back.
Tip #4- Re-assess. Once everything is put away, take another long look at your closet. Is everything easy to reach? Do you like the organization system and can keep it up? Be proud of your work. You have just tackled the black hole of bedrooms, and streamlined your morning routine.
Organizing the Kids' Rooms
This was a daily issue at my house. It took three times as long to get the kids ready. Digging through drawers to find clothes that fit, rummaging through the toy box for a lost shoe, and, my personal favorite, tearing a room apart to find the lost sippy cup or teddy bear. I needed the space to be workable. My kids needed to be able to find their socks and shoes, have a place for all the toys, and for me not to stub my toe every night at bedtime. Here's how we handle shoes.
The task seemed daunting, and as much as I wanted it done, I continued putting it off. Where should I start? How can I make the most of my space? I made countless drawings of room layouts, toy box placement, and clothing arrangement. I finally devised a plan, and got it all done in a few short hours. The first step was to once again, remove everything. I pulled all the furniture, toys, and clothes out of the room. I needed to start from scratch. The dressers were the easy part. I went to the dollar store and picked up several clear plastic bins.
I designated two drawers to hold all the socks, shoes, underwear, burp rags, bibs and hats. Each bin was labeled and placed in the drawer. I began sorting the mountain of clothes. I had a different bin for each child's socks, all bibs and hats were in one bin, and my burp cloths were neatly folded and easily accessible. It was a dream come true. No more searching for matching socks in the right size. That would cut 10 minutes from day right there!
Then came the toys. I went through all the toy boxes, throwing away anything broken and donating anything the kids didn't play with anymore. You'd be surprised how many toys kids have! All the cheap kids meal toys-gone. Those stuffed animals from three years ago? Gone. I reduced it from 3 toy boxes to 1. This alone would cut clean up time in half. Then it was time for the rest of the clothes. If it didn't fit it went in the donation bin. I had a drawer for pajamas, a drawer for pants/shorts, a drawer for shirts/dresses, and the bottom drawer was things that were still too big but would fit soon. This made my life a lot easier. On to the furniture. All bedding was washed and carefully re-assembled into the masterpiece pictured on the original packaging. I knew it wouldn't stay that way long, but it looked so much better.All furniture was wiped down with disinfecting wipes. I has a small set of plastic drawers on top of the dressers. This held lotions, diaper creams, thermometers, hair bows, and band-aids for easy access. No more hunting down a matching bow or scrambling for a band-aid with a screaming child. My life was getting better by the second. A few decorative pictures and strategically placed stuffed animal and voila! A new clean room for the kids.
You can see our updated toy storage here.
Organizing The Bathroom
This is where things got tricky. I had to make sure everything was withing my reach, but all cleaning supplies and medicines were safely tucked away. I went back to the dollar store for more bins. This time I opted for mesh and plastic bins with holes. I needed a way to store the bath products and a bin that could still get air, to avoid mold. I got bright colors to match the decor. The first bin held all 600 bottles (or so it seemed) of bubble bath, foam soap, shampoo and shaving creams. The second bin was for bath toys and sponges. We seem to have a growing collection of these. Having them all in one place made bath time easier. The kids could each pick out a toy, or I could dump the entire contents in the tub. After the bath, they would help put them back in the bin and make clean up easier.
Next up was the cabinet space. In our bathroom, we had only a small medicine cabinet behind the mirror. Simply not enough space for a family of five. We got a tall, thin set of Rubbermaid drawers to go next to the sink. Again, safety was the top priority. All razors, medications and other sharp objects went in the highest drawer. In the middle went the hairdryer and other appliances. The bottom drawers were make-up (not what I want the kids playing with, but at least it wouldn't hurt them) and extra soaps, toothpaste/toothbrushes, and hair brushes. On the top "shelf" we had a cup that held everyone's toothbrush and the bottle of toothpaste. We like to have these sitting out as a constant reminder for good oral hygiene. All surfaces were wiped with disinfecting wipes and a few candles made it an inviting space. Everything had a place, and we all knew where to find it. This made mornings and bedtimes slightly easier. As long as you have 5 people and 1 sink, things are always going to be a little crazy.
![]() |
| Our bathroom closet in our new house |
It make take a day of work, but organizing your house is well worth it. Think about how much time you waste now looking for things and scrambling to get it all together in the morning. Once you've learned the basic steps, you can apply them to any space. Assess the needs of the space, devise a plan and organization system, pull it all out, then only put back what is needed. You can have your home cleaned up and working like it should in no time!
Monday, February 2, 2015
Feeding Young Children
When talking with some friends last night, we were discussing our children's eating habits. They are first time moms who just want the best for their little one, and by baby number 3, I had learned a few tricks. So we agreed I would write out a meal plan for them, with ideas and cooking tips to get their munchkins to be as big of a pig as my daughter is. She has no fear, and would dive into a bowl of taco salad if you loosened your grip. But she also has two older brothers to keep up with. For an only child, they may not care as much about what or how they're eating, as long as they have mommy's attention while doing so. So this is my meager attempt to help these moms keep their sanity while battling meal time.
First, consider who you're feeding. Your baby neither needs nor wants fancy sushi. Simple, healthy meals can be easy and fun. The goal is to get baby all the nutrients he/she needs, while encouraging him/her to try new things. Feedings are a journey, not a destination. Enjoy the trip along the way.
The easiest way to plan meals for my kids is to make a list. I divide foods into categories, then pick one food from each column. How you combine them is only limited by your imagination. NO COOKING SKILLS REQUIRED. I use three basic things to cook: A skillet, a pot, or a microwave-safe bowl. You don't need a fancy baby food maker or food processor. So resist the late night infomercials and save some money! My list is as follows:
DAIRY
Milk (cow, almond, soy, any kind)
Cheese
Cream Cheese
Yogurt
Eggs
GRAIN
Pasta
Whole Wheat Tortillas
Toast
Oatmeal
Bagels
Pita Bread
Rice
MEAT
Lean Turkey
Chicken
Beef
Ham
Shrimp
Fish
FRUIT
Apples
Bananas
Grapes
Melons
Berries
Peaches
VEGGIES
Corn
Peas
Carrots
Beans
Potatoes
Tomatoes (I know, it's a fruit, but I cook it, so it goes with veggies)
Soy Beans
Broccoli
ADDITIONS
Cheeses
Alfredo Sauce
Marinara
Ranch
Ketchup
Garlic Butter
Nut Butter (peanut, almond, hazelnut)
Raisins
Soy Sauce
Hummus
I generally start with the grains list. Am I in the mood for pasta? Craving tacos? Need a meal fast? Let's say I have a hankering for stir-fry. I would pick my pasta. Then onto the meats. I prefer chicken stir-fry. Then I pick out fruits and veggies. I like peppers, carrots, peas, beans, and tomatoes. Then I choose my sauce or topping. Add in a little soy sauce. Maybe sprinkle some garlic powder. Top sprinkled almonds (not for baby, for mommy). And voila! You have an easy dish. Throw it all in the skillet and let it cook while you play peek-a-boo.
As for the shopping and having everything ready to go- that's easy! Here's your shopping list:
10 bags of frozen veggies/fruits. Any kind you like- just peas, peas-and-carrots, mixed veggies, broccoli, it's up to you.
10 lbs of meat. Either frozen chicken breast, ground turkey/beef, or a combination of both. Whatever your family likes best.
10 boxes of noodles or pasta. Rotini, ravioli, linguine, spaghetti, pin wheels, alphabet soup, egg white noodles, ramen...there's 100s of possibilities!
10 jars of sauce. Pesto, Alfredo, Marinara, cheese sauce, soy sauce, terryaki sauce- get a variety.
And most importantly- a box of Ziploc bags.
When I get home from the store, I give the kids a snack to keep them occupied while I get to work. I divide everything up. 1lb of meat per bag, 1-2 cups fruits/veggies per bag, 1/2 box of pasta per bag, and just leave the sauces in jars. Pasta can go back in the pantry, everything else in the freezer. Our deep freezer stays stocked so meals are just minutes away. For the fridge, a few packs of plain yogurt, some fresh fruits like apples and bananas, milk, eggs, and cheese. Now you always have a healthy snack on hand! Just pick 1-2 things your child likes to eat, and combine them in new ways.
Anything can be a pizza, taco, casserole, or soup. Pick up a box of Bisquick and you're never more than 20 minutes from a delicious casserole. There are more recipes on the box! We do easy chicken pot pie- mix the dough according to directions, add in chicken and bag of frozen veggies- bake. Easy as...pie! Same with soups. We keep cans (or freezer containers) of chicken stock or chicken broth, and soups are quick and easy. Running low on ingredients? Throw in everything you have left! You can't go wrong. Chicken, beef, veggies, whatever you like. Let simmer while you set the table, round up the baby and strap him in, and you're good to go!
Meal time shouldn't be stressful, it should be a time for family and conversation. Follow these tips for easy meals and watch for more recipes this week!
Thursday, January 22, 2015
Home Office Part 3: Homework Table
Part 1: The Setup Part 2: Backpack Station
Part three of our home office series involves a homework area for the kids. Getting kids to focus on their homework is a task in itself. You can make this chore a bit easier by creating a designated area free of distraction for them to work.
The first step is to find an area of your home with ample space and minimal distractions. Do you have only one child or do you need to accommodate several children? Is there plenty of light or will you need to add a lamp? Finding the right location and figuring out a setup that works for your family is the first, and often the biggest, step in the process. We decided on this corner of the home office.
Once you have an idea in mind and measurements of the space, you need to find a table or desk to fit. You don't need to spend a lot of money, it just needs to serve its purpose. Our first homework table we found at a yard sale. Our second one was an old folding table we had in the garage. Check thrift stores, yard sales, or even other areas of your home for furniture to fit your needs.
And finally, the finishing touches. You'll need to have all needed supplies within reach but not cluttering the work area. We have a simple three drawer cart which slides under the the table and out of the way. We happened to have an extra one laying around, use whatever you have. The goal is not to spend a lot of money, just to have a functional homework area. You can use old jars, baskets, anything to corral the supplies. Our drawers hold pencils and sharpeners, extra paper, and coloring or activity books for the younger ones. We have little mason jars on top for crayons, scissors, glue, and dry erase markers.
Above the table we have a US map, with pins marking where family members are. We also have the Ten Commandments and the fruits of the spirit to remind everyone of the behavior and character expected of them. The giant white board is used for my assignments and project deadlines.
Now we have a quiet area to get work done and homework time is slightly less stressful.It is right next to my desk in the office, so the computer is close by if needed for research and I can work alongside them in the afternoons.
Products Used:
The Ten Commandments for Kids Chart
Carson Dellosa Word Strips Sentence Strips (4455)
Sharpie Fine Point Permanent Markers, 12 Colored Markers(30072)
Plastic 3 Drawer Storage
Drawer Organizer Bins
Products Used:
The Ten Commandments for Kids Chart
Carson Dellosa Word Strips Sentence Strips (4455)
Sharpie Fine Point Permanent Markers, 12 Colored Markers(30072)
Plastic 3 Drawer Storage
Drawer Organizer Bins
Monday, January 19, 2015
Discipline At Home
Deciding how to discipline your children is one of the hardest decisions a parent has to make. As children get older, rules and consequences evolve with them. Trying to come up with a good system that was consistent for all three kids was a challenge, but we figured out a way to be consistent across the age gaps, as well as with their classroom policies.
We decided on a behavior chart, but with a twist.
The first step was to agree on some House Rules. If we were going to give them a consequence for not following a rule, it's only fair that everyone know the rules. We went over them as a family, made sure everyone understood, then posted them next to the clip chart.
After we agreed on the rules, we needed to establish consequences. Have you ever been so frustrated at the end of the day that you just start giving out weird punishments? "If you don't stop right now I'm taking away all your toys!" There have been times when I was too tired or too angry to think of an appropriate consequence, and the same punishment wouldn't always be appropriate for all of my kids. I needed a better system. So, we created a list of consequences that would be age appropriate for all of them, as well as practical.
Here's the twist: I don't give out the consequences! They either draw a number or roll a dice, and whatever number it lands on is the consequence. This eliminates one parent being harsh and the other lenient, or kids being angry over the consequence (or at least, blaming me for it). We also included a "Lucky Day" one, which is basically a get-out-of-jail-free spot. We need to teach mercy and forgiveness even in the face of disobedience, so giving them a chance for no consequence and to be shown mercy just made sense.
As for the clip chart, it's pretty simple. Each kid has their own color clip. They start on green every day. If they are good at school, or clip up on the behavior chart at school, they can clip up to blue when they get home. Likewise, if they clip down at school, they will clip down to yellow when they get back. If they continue to make good choices, such as helping without being asked, sharing with a sibling, or another good deed, they clip up. If they break a rule, they clip down. If you clip to orange, you roll the dice for a consequence. If you clip down again to red, you must go to bed early and try again tomorrow.
In this picture you can see our reward bucket. If you clip up to pink, and stay there until bedtime, you can pick a prize from the box. They don't get the prize until bedtime, otherwise they could act like angels, get the prize, then turn back to their demon spawn selves. You must make it to the end of the day, but they have plenty of opportunities.
You can fill your Reward Bucket with anything you like- candy, small toys, "coupons" for favorite meals or special treats...whatever works for your family. We have quite a mix of items and the kids enjoy selecting a special treat.
This system has worked great for us, but you may need to tweak it to fit your family's needs. Now they can quickly see the rules to follow, and the consequences for breaking them. It solves a lot of arguments in my house!
We decided on a behavior chart, but with a twist.
The first step was to agree on some House Rules. If we were going to give them a consequence for not following a rule, it's only fair that everyone know the rules. We went over them as a family, made sure everyone understood, then posted them next to the clip chart.
After we agreed on the rules, we needed to establish consequences. Have you ever been so frustrated at the end of the day that you just start giving out weird punishments? "If you don't stop right now I'm taking away all your toys!" There have been times when I was too tired or too angry to think of an appropriate consequence, and the same punishment wouldn't always be appropriate for all of my kids. I needed a better system. So, we created a list of consequences that would be age appropriate for all of them, as well as practical.
Here's the twist: I don't give out the consequences! They either draw a number or roll a dice, and whatever number it lands on is the consequence. This eliminates one parent being harsh and the other lenient, or kids being angry over the consequence (or at least, blaming me for it). We also included a "Lucky Day" one, which is basically a get-out-of-jail-free spot. We need to teach mercy and forgiveness even in the face of disobedience, so giving them a chance for no consequence and to be shown mercy just made sense.
As for the clip chart, it's pretty simple. Each kid has their own color clip. They start on green every day. If they are good at school, or clip up on the behavior chart at school, they can clip up to blue when they get home. Likewise, if they clip down at school, they will clip down to yellow when they get back. If they continue to make good choices, such as helping without being asked, sharing with a sibling, or another good deed, they clip up. If they break a rule, they clip down. If you clip to orange, you roll the dice for a consequence. If you clip down again to red, you must go to bed early and try again tomorrow.
In this picture you can see our reward bucket. If you clip up to pink, and stay there until bedtime, you can pick a prize from the box. They don't get the prize until bedtime, otherwise they could act like angels, get the prize, then turn back to their demon spawn selves. You must make it to the end of the day, but they have plenty of opportunities.
You can fill your Reward Bucket with anything you like- candy, small toys, "coupons" for favorite meals or special treats...whatever works for your family. We have quite a mix of items and the kids enjoy selecting a special treat.
This system has worked great for us, but you may need to tweak it to fit your family's needs. Now they can quickly see the rules to follow, and the consequences for breaking them. It solves a lot of arguments in my house!
Toy Storage
If your kids are anything like mine, toy storage is a never ending problem. You want to keep things organized, the kids don't really care. You want them to put away their own toys, they just want to play and have fun.
I needed a toy storage system that would work for all three of my children. It had to hold dolls and cars and an abundance of Legos. My very anal son and I like for everything to be labeled. My oldest son just needs direct orders as where to put things. And my daughter....well, she's determined to ruin any system I try.
I decided on a combination of baskets and buckets to utilize space but also sort the toys. As usual, the hardest part was picking out exactly what I wanted at a price I could afford.
Next I needed medium-sized storage bins for toy categories. Dress up, baby dolls and accessories, and play kitchen items went in these white stackable containers. They are sturdy enough when stacked that they are not likely to get tipped over or fall apart, and the kids can easily pull stuff out and shove stuff back in without knocking them down.
With three different ages, the toy selection can vary greatly. I need smaller containers to hold the numerous sets of smaller items. Matchbox cars, army men, Little People, bey blades, and action figures fit perfectly in these stackable bins. Because the front piece and small and the back is hard to see, these bins were labeled on the bottom inside each one.
And finally, the Lego collection. We have our collection split up in several ways. We have boxes downstairs housing completed display sets, generally the 500-1,000 piece sets of buildings, vehicles, or other special projects. We have a display case to sort all the Lego people, and all the Duplo blocks go in the big tub with the other blocks. I needed a place to store the everyday building Legos, mainly bricks and basic building elements. I wanted it to be short and wide, so the kids could easily see inside without dumping the whole tub. This large snapping tote was just the right fit!
All of them fit in the closet nicely, with ample room to move around and clean up. Please ignore the wall art, my little graffiti demon has left hardly a space untouched by her creativity.
This project was a bit more expensive than most of my others, but each bin can also be rearranged or repurposed later as our needs change.
Large Black Tubs: $4 each.....$12
Medium Stacking Bins: $5.....$15
Small Stacking Bins: 3/$5......$10
Labels I Already Had: $0........$0
Total Cost................................$37
Now the kids have no excuse for a dirty room- they know where everything goes and everything has a specific place!
I needed a toy storage system that would work for all three of my children. It had to hold dolls and cars and an abundance of Legos. My very anal son and I like for everything to be labeled. My oldest son just needs direct orders as where to put things. And my daughter....well, she's determined to ruin any system I try.
I decided on a combination of baskets and buckets to utilize space but also sort the toys. As usual, the hardest part was picking out exactly what I wanted at a price I could afford.
I decided big buckets were best for large and odd shaped toys. All blocks, large cars, and stuffed animals went into these large black tubs. I would have used their specific colors, but I could only find black.
Next I needed medium-sized storage bins for toy categories. Dress up, baby dolls and accessories, and play kitchen items went in these white stackable containers. They are sturdy enough when stacked that they are not likely to get tipped over or fall apart, and the kids can easily pull stuff out and shove stuff back in without knocking them down.
With three different ages, the toy selection can vary greatly. I need smaller containers to hold the numerous sets of smaller items. Matchbox cars, army men, Little People, bey blades, and action figures fit perfectly in these stackable bins. Because the front piece and small and the back is hard to see, these bins were labeled on the bottom inside each one.
And finally, the Lego collection. We have our collection split up in several ways. We have boxes downstairs housing completed display sets, generally the 500-1,000 piece sets of buildings, vehicles, or other special projects. We have a display case to sort all the Lego people, and all the Duplo blocks go in the big tub with the other blocks. I needed a place to store the everyday building Legos, mainly bricks and basic building elements. I wanted it to be short and wide, so the kids could easily see inside without dumping the whole tub. This large snapping tote was just the right fit!
All of them fit in the closet nicely, with ample room to move around and clean up. Please ignore the wall art, my little graffiti demon has left hardly a space untouched by her creativity.
This project was a bit more expensive than most of my others, but each bin can also be rearranged or repurposed later as our needs change.
Large Black Tubs: $4 each.....$12
Medium Stacking Bins: $5.....$15
Small Stacking Bins: 3/$5......$10
Labels I Already Had: $0........$0
Total Cost................................$37
Now the kids have no excuse for a dirty room- they know where everything goes and everything has a specific place!
Posted by
Unknown
at
10:33 PM
No comments:
Labels:
cleaning,
closet,
kids,
organization,
storage,
toys
Mornings Are Hard
Mornings Are Hard
Getting children ready in the morning can be a challenge.
Add in pets to take care of, parents who have to get ready for work, and
differing schedules, and you’ve got a recipe for chaos. Planning ahead is the
key to success. Many people choose to pick out their clothing the night before,
but I can’t always guarantee I will be home at a decent time, or remember to do
it on hectic nights, so I do the entire week at once. It has made mornings so
much easier!
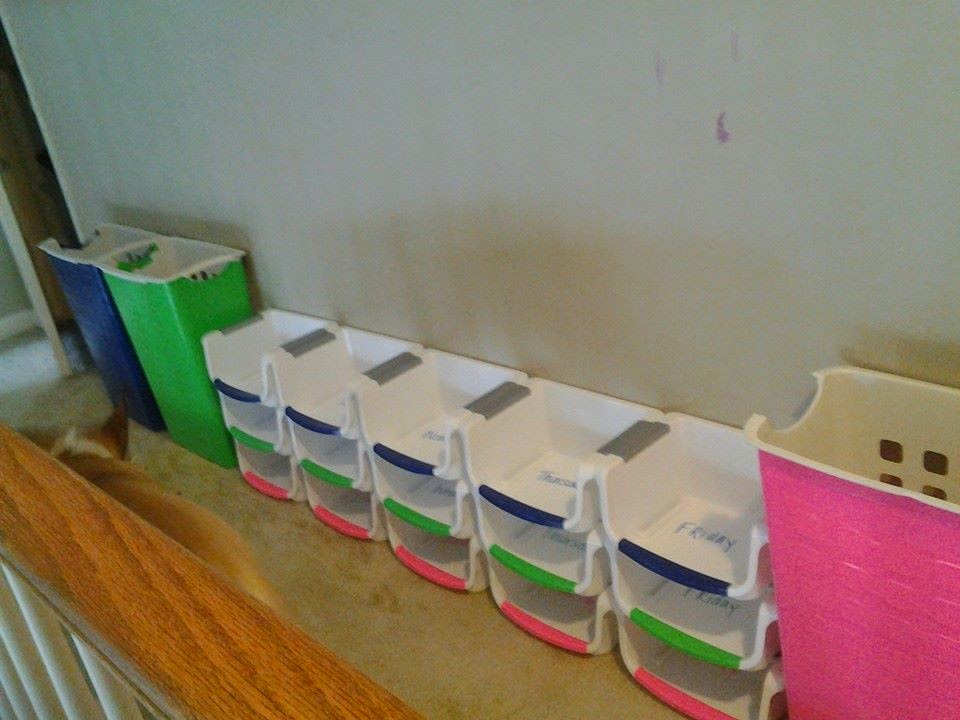
First, I set up a weekly organizer. Finding the right sizes,
colors and quantities were the hardest part of this. I ended up using these
stacking organizers I found in the kitchen section at Wal-Mart. They came 3 in
a pack for about $5, so they were affordable enough to stock up on. I chose to
do only kids’ clothing first, so I needed 15 (3 kids, 5 days). I opted not to
do weekend outfits as we rarely leave the house on weekends. Since I could only
find white bins, I needed to color code them myself. I used a roll of duct tape
in each of their colors and just put a strip on the front. It needed to be
visible when the containers were full, but it wasn’t necessary to cover the
entire bin. I used the leftover tape to identify laundry baskets and other
containers, but more on that later.
On the inside of each bin, I wrote the day of the week. It
only had to be visible when filling the containers, so I just wrote it with a
marker inside.
I then stacked them according to height, and lined them up for the week. This made it easier for my youngest to figure out which one to grab, since she was still learning the days of the week. Everyone grabbed from the same stack on the same day.
In each bin, I placed socks, underwear, pants, shirt, and
matching accessories if needed (bow, belt, etc.). Everything they needed was
ready to go.
We have our shoes in a separate organizer, but you could include them in a weekly clothing organizer if you wished. We no longer spent precious time hunting for the right pieces, and Daddy no longer dressed the children in off-season, ill-fitting clothes.
How it works: as I take clothes out of the dryer, or go
through closets for already put away clothes, I match the outfits and fold them
together. Since I only do Mon-Fri, I have all weekend to get it together. If I
am washing clothes during the week, I will fold the outfits I want and separate
them, and the kids put the rest of the clothes away. This way, when the
organizer is emptied on Friday mornings, I have most everything ready to fill
it for the next week. You could do it all Sunday night, or two weeks at a time,
or whatever works for you. As long as everything is ready to go Monday morning,
you can’t go wrong.
Now enjoy your morning cup of coffee just a little bit
longer, the hard part is done!
Items Used:
Scotch Super Thin Waterproof Vinyl Plastic Colored Tape, .75-Inch by 125-Inch, 5-Pack
Basic White Stacking Bins - 3-pack - 12" X 9" X 5"
Sharpie Fine Point Permanent Markers, 12 Colored Markers(30072)
Items Used:
Scotch Super Thin Waterproof Vinyl Plastic Colored Tape, .75-Inch by 125-Inch, 5-Pack
Basic White Stacking Bins - 3-pack - 12" X 9" X 5"
Sharpie Fine Point Permanent Markers, 12 Colored Markers(30072)
Subscribe to:
Posts (Atom)