Organizing a laundry room can be a challenge for many families. The biggest issue is having enough space. When I sat out to revamp my laundry room, I took to Pinterest. I quickly became disappointed as everyone seemed to have giant laundry rooms. Our old house had no laundry room, just the washer and dryer set up in the kitchen, with no doors or even a way to hide it with a curtain. When we moved here, I fell in love with the laundry room. It seemed very spacious, was tucked away in a corner, and had a door to hide all my dirty clothes.
Then I started putting stuff in the laundry room. It got smaller by the minute.
Finding a good inspiration for my laundry room was nearly impossible. Everything was either for tiny laundry closets or what seemed like laundry mansions. I had to get creative.
As with all my projects, it started with a list. What did I absolutely need to have in there? What would be nice to have? What were my problem areas that needed a little help? Once I figured out a general idea of what I needed and wanted, I set out to find products to fit my needs.
I knew I wanted more storage, but finding something to fit in the space was a challenge. I ended up getting an old dresser and cutting a piece of the back corner off so it would fit properly. I had originally just stuck it between the washer and dryer, but then inevitably stuff would fall behind it and I would have to pull everything out to reach it. Cutting it wasn't my first thought, and certainly not the prettiest solution, but without the help of my husband or power tools, it got the job done. Now it serves a purpose without creating more hassle for me later.
What exactly to put in each drawer and how to organize it required a little thought, but I went back to my list and assessed my needs and wants. Suddenly I knew just what I wanted to do.
Laundry Supplies. Between making my own laundry detergent and dryer sheets, and all the various products we keep around, I needed a place to store them all without piling them on my valuable shelf space. The top drawer was the perfect place to hide everything but keep it accessible.
Cleaning Supplies. Again, I make my own and have a plethora of products on hand. All those little items needed a home, but I needed them in reach of my kids. Now when they get ready to do their chores, they don't have to hunt for the right supplies or ask for help to get them down from the shelf.
Dog Supplies. We don't have a ton of pet stuff, but the extra leash, training pads for car rides, and grooming supplies needed a home. Half a drawer was plenty of space, and she couldn't get to it to chew on everything.
Cleaning Rags. I love rags. I have tons of them. Microfiber for cleaning, larger ones for kitchen messes, and a giant pile of perfectly-12-by-12 white rags for hygiene and grooming. I also like to keep them separate. Now all of my cleaning rags are together, and near the cleaners, for easy access and use.
Outgrown Clothes. I've used many different systems over the years to deal with outgrown clothes. When my oldest son outgrows something, I keep it for my younger son. But when my younger two outgrow things, I pass them on to friends. Giving them one shirt at a time doesn't make much sense, but having piles of old clothes around isn't ideal either. A drawer in the laundry room was the perfect solution. Once the clothes come out of the dryer, they get sorted. When I see something that has been outgrown or was looking a little too tight last week, I fold it and put it in the drawer. When the drawer gets full, I move my son's clothes to keep to a tote in the garage, and the others I give to a friend. Now I have an empty drawer and can start all over. The clothes are handy (which is great for when our friends come to visit and need an extra change of clothes or jacket on cool nights), but out of the way and organized. Everything is clean, folded, and ready to go. I think this is my favorite part of my laundry room.
Then comes the actual laundry. There are six people in my home. Two adults with very messy jobs. Three kids who love to get dirty. Two kids who still wet the bed. A dog that has a mind of her own. And a Mommy who has to clean up after it all. We have a LOT of laundry. We used to spend hours sorting everything before we washed, only to have it ruined when the clean clothes piled up because I hadn't had time to put them away. Now, everyone has their own dirty AND clean laundry basket. My roommate keeps his stuff in his room, so his laundry doesn't end up mixed in with everyone else's.
I opted for one of the laundry sorters with a hanging rack. This makes the entire process much easier. I can hang dry items as needed, and I have a place to hang up clean clothes when I folding and putting everything away. My ironing board is mounted to the back of my laundry room door, so it's easy to hang up freshly ironed clothes. Each person has their own basket, and of course, everything is labeled in the correct color. We have a "house" basket for towels, sheets, and blankets. We have tons of towels and they really needed their own place.
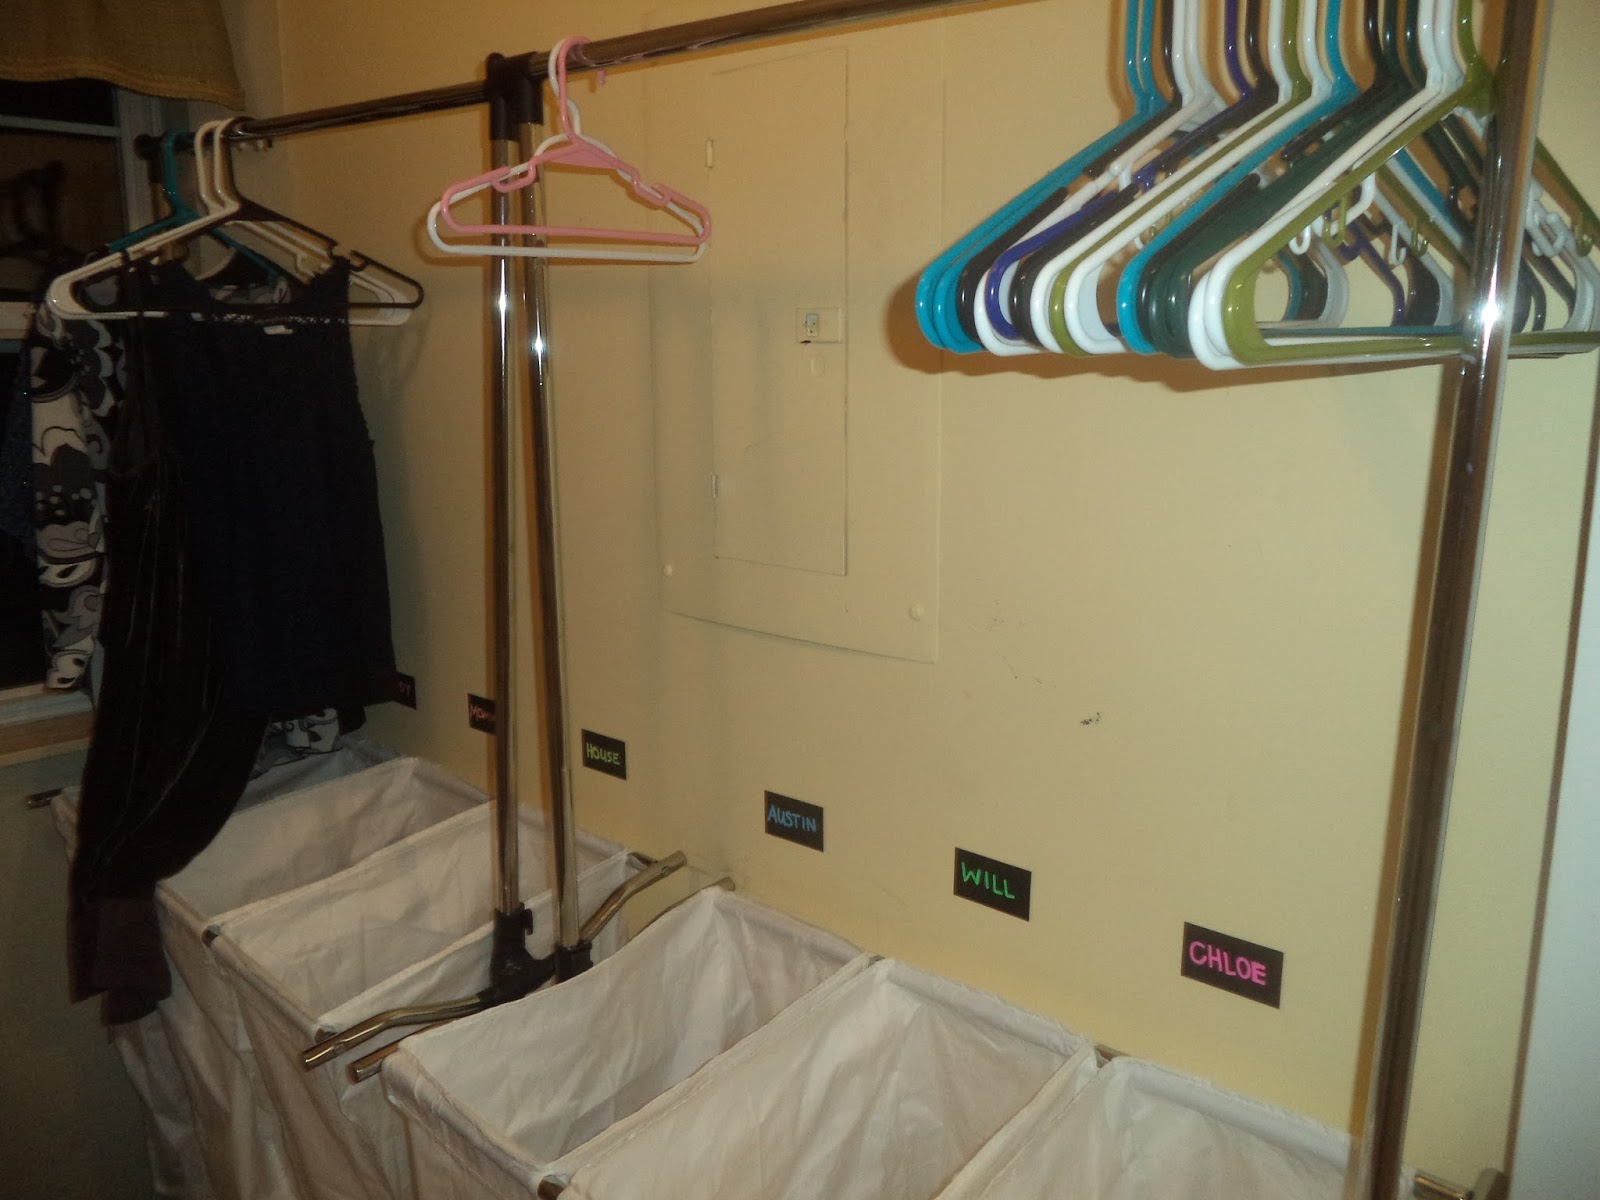
(Almost) everyone puts away their own laundry. My youngest needs a little help, and I take care of mine and my husbands. My oldest son and I take turns with towels and blankets. This system makes my life so much easier. Everything is sorted before and after washing, which makes finding mates to socks and the right person's underwear much simpler. When it's time for clothes to be put away, each child takes their basket to the living room where they can spread out, and they hang up or fold all their clothes and get them put away. The clean baskets go back on the frame. I have an extra bag or two in case one tears or needs washing. I keep my hanger holders next to the baskets in the laundry room, so there's no running around and hunting for anything when it's time to work- everything is at hand.
Limited shelf space. This is a problem in most laundry rooms, I'm sure. I have one really long shelf, which is wonderful at times. But it's not very deep and one bottle of laundry detergent is about all you can squeeze on there. I keep all my detergent on one side, then the occasional bottle of bleach or fabric softener in the middle. My big boxes of detergent supplies hide in the corner, since they only get used every few weeks. This is where I utilize the top of the dresser. I keep a small trashcan for lint and the inevitable stickers my daughter puts everywhere. I have a small bin for found items in the dryer or pockets, belts, and other items that shouldn't go through the wash. When the laundry is done, I move belts and clothing items to clean laundry baskets, and have the kids return the other items to their proper homes.
Finishing touches and little details. I wish I had more space to add decorations and make it look nicer, but you work with what you've got. I keep a measuring cup hanging by the washer for detergent, along with a list of instructions and sizes for when somebody is helping out, like my son or husband. A couple "plants" in the window, okay, just pretty pots with some dead grass. I have a black thumb and none of my laundry room plants survived. I use a marker to label settings on the washer for my son, it comes right off with a magic eraser when I clean the machine. A hook for the giant lint-trap cleaning brush. A small set of tools for quick fixes. One of these days I'll make some decor to tie it all together.
And that's it! An organized laundry room with everything I need to keep my family clothed. Do you have any tips to add? Is your laundry room in need of some help or is it more like those laundry mansions on Pinterest?
Showing posts with label organization. Show all posts
Wednesday, October 14, 2015
Tuesday, June 23, 2015
Organizing Tupperware Containers
Does your collection of food storage look a little rough? Can you just never find what you need? And you have no matching lids, but plenty of lids in the cabinet? I found a solution! Or, at least one that helps me out. And you don't have to spend a dime to buy a new system or matching containers.
Once everything was labeled, they all stacked neatly and nested within each other.
Which made my cabinet look a lot better.
Start by pulling out ALL of your containers.
Next, match what you can. I just created different piles of lids and containers. Don't try to match the lid to the container yet, just get all like pieces together.
Once you have everything sorted, match lids to containers. It will be much easier now that you can see everything at once and you won't try the same container 5 times.
Once you have everything matched up, set aside anything odd pieces and leftovers. Now, taking one pile at a time, label matching containers and lids. I used the alphabet, but you could number them too. All my bowls of this size got marked with an "A" on the bottom, and the matching lids got "A" on the top. I just used a permanent marker, and it hasn't come off in the dishwasher yet!
Every container and matching lid got a letter.
Once everything was labeled, they all stacked neatly and nested within each other.
Which made my cabinet look a lot better.
Once they were all nested, they became much easier to store. I put my small containers for leftovers in the kitchen drawers, my medium containers for individual meals in one of the cabinets, and my large containers for freezer meals I moved out of the kitchen entirely- they are stacked on a shelf next to the deep freezer in the garage. This has saved me a ton of kitchen space, but also a ton of time. With the containers and matching lids all labeled, there's no longer a fight to find what I need. You could even store all your lids in a bin standing up, and just thumb through the corners to find the letter you need. There are several possibilities, so just find a system that works for you.
Tuesday, June 16, 2015
Organizing Craft Supplies
Craft supplies. We all have them, to varying degrees. I am currently working on a new craft table, but until that gets finished and I can get all my supplies in one place, I'm working on one section at a time.
Since I've been painting a lot lately, I decided to get all my paint supplies organized first. I had a lot of fun browsing Pinterest for ideas and scouring my house for containers I could use instead of spending money on new ones. Of course, my number one goal was to get everything sorted and labeled.
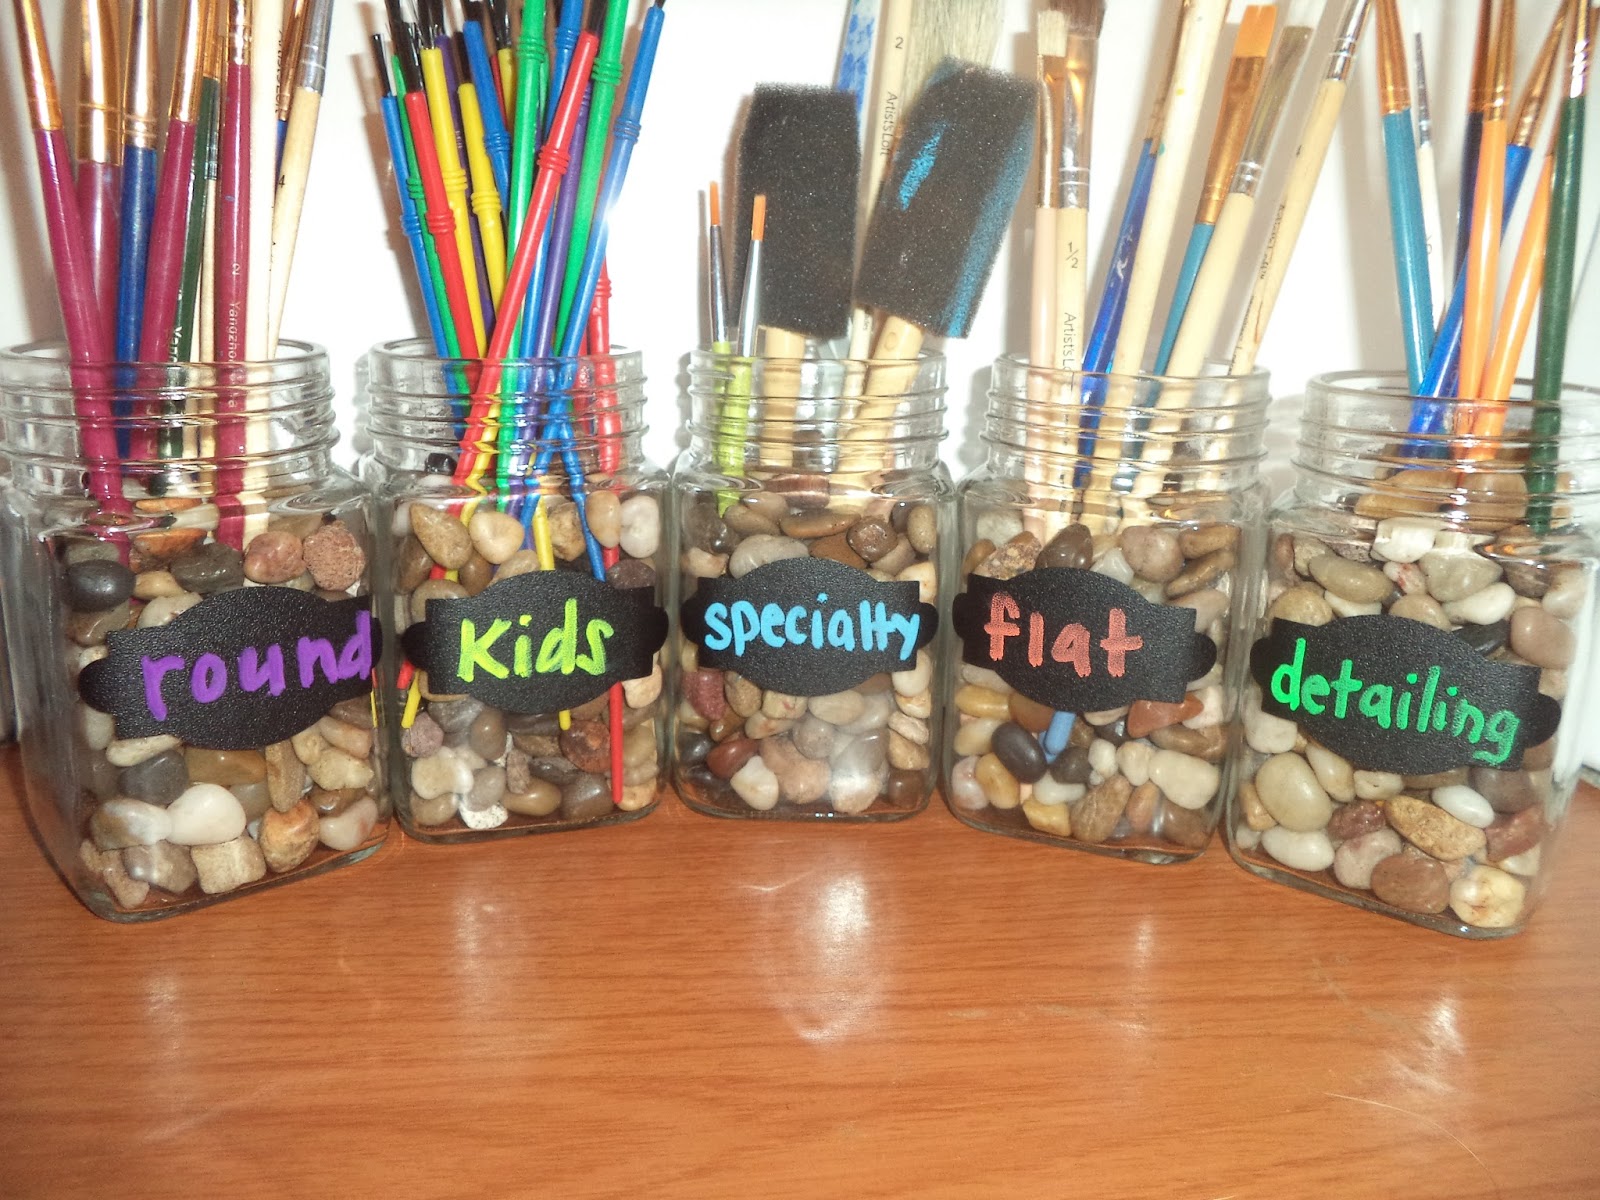
I started with my brushed. Using a few clear jars and a handful of river rocks, I sorted my brushes by type.
Next, I needed to corral my paints. I couldn't find a system I liked as I use mostly small tubes of acrylic paint rather than the larger bottles of craft paint. I was looking at my make-up storage and realized my lipstick holder would be perfect! I moved my lipsticks to another container and grabbed my paints. They all stand up perfectly so I can see them, and it didn't cost a dime.
Next, I had a few paint pens I use for detailing and writing, and wanted to keep them together. This was an easy fix, I just grabbed a small zipper pouch and stuck a label on it.
Then, I had to deal with my odds and ends. A few sponges, some painter's tape, a handful of paint bottles...nothing really seemed to fit my needs. So I decided to keep them together in one container. Sorry, I still can't get my pictures to rotate.
I stacked my craft paints on the bottom, put my painter's tape in the middle, and my sponges on top. I may very well move everything to their own containers once I get my craft table all set up, but for now this keeps everything neat and organized.
Since I've been painting a lot lately, I decided to get all my paint supplies organized first. I had a lot of fun browsing Pinterest for ideas and scouring my house for containers I could use instead of spending money on new ones. Of course, my number one goal was to get everything sorted and labeled.
I started with my brushed. Using a few clear jars and a handful of river rocks, I sorted my brushes by type.
Next, I needed to corral my paints. I couldn't find a system I liked as I use mostly small tubes of acrylic paint rather than the larger bottles of craft paint. I was looking at my make-up storage and realized my lipstick holder would be perfect! I moved my lipsticks to another container and grabbed my paints. They all stand up perfectly so I can see them, and it didn't cost a dime.
Next, I had a few paint pens I use for detailing and writing, and wanted to keep them together. This was an easy fix, I just grabbed a small zipper pouch and stuck a label on it.
Then, I had to deal with my odds and ends. A few sponges, some painter's tape, a handful of paint bottles...nothing really seemed to fit my needs. So I decided to keep them together in one container. Sorry, I still can't get my pictures to rotate.
I stacked my craft paints on the bottom, put my painter's tape in the middle, and my sponges on top. I may very well move everything to their own containers once I get my craft table all set up, but for now this keeps everything neat and organized.
And here it is all together:
Posted by
Unknown
at
1:00 AM
No comments:
Labels:
art,
brushes,
craft,
organization,
paints,
supplies
Sunday, March 8, 2015
How To Get Organized
How To: Get Organized
Getting organized is a challenge everyone faces from day to day. Whether it be organizing your house, your closet, your office- something is always in need of a little help. I have been tackling the task of organizing my house, and it's been a long process. I've gathered some tips that may help you get organized once and for all.
Tip #1 - Assess your space. Do you share a closet or are you blessed with a walk-in all your own? Do you have shoes laying all over the floor with no home, or hundreds of empty hangers with clothes scattered around the room? Once you know what the problem is you are better equipped to fix it. If you have an undying love of shoes, invest in a sturdy shoe rack large enough to hold your current stash, with room to grow for your next great find. If you have thousands of t-shirts and only three nice blouses, a hanging organizer may better suit your needs. If you keep all accessories, such as belts, scarves, handbags and jewelry in your closet, consider building a shelf for the handbags, and hanging hooks for belts and scarves. Once you have a basic plan laid out, you can pay more attention to details. Do you want your clothes sorted by season, or perhaps colors? Do you plan in entire outfits or separate pant from tops? If you like to plan in terms of outfits, a few pant hangers will do wonders for your morning routine. Pair the top and pants together, and just grab-and-go in the morning. If you have a varying work schedule, you may want to plan according to the day. You can find closet rod organizers at any mass retailer. See how to make your own simple closet dividers.
If Friday is "Jeans Day" at work, put your favorite pair behind the Friday tag. If you know you have an interview on Tuesday, place your suit behind the Tuesday tag. Whatever system you choose, make sure it works for you. If you know you won't sort through colors when putting laundry away, a color-coded closet won't stay neat for long. If you like to options, chances are a weekly plan of outfits will fall through. See how we organize outfits for the week here.
Tip # 2- Take it all out! Once you've decided on a system and bought the necessary supplies, take everything out of the closet. Things are going to get a lot worse before they get better.
Take this opportunity to go through your clothes. If you haven't worn it in a year, get rid of it. I make 3 piles, with three labeled bins. Charity, Trash, Keep. If it's in decent shape, but you just don't love it, put it in the charity bin. There's no need to keep things you won't wear, it's only taking up space. That holey pair of underwear, on the other hand, can go straight into the trash. Only put back in your closet what you know you will wear. If it doesn't fit, and hasn't for a while, toss it.
You don't need a daily reminder of any weight lost or gained. The only things that should be in your closet are clothes you fit and love. Donate everything else (except for those underwear!)
Tip #3- Have your organization system installed before you put anything away. Don't hang up all the clothes then attempt to rearrange the outfits. It will only stress you out and cause more work. Once your system, whether it be daily outfits, types of clothing, or business/casual wear is in place- you're ready to put it all back.
Tip #4- Re-assess. Once everything is put away, take another long look at your closet. Is everything easy to reach? Do you like the organization system and can keep it up? Be proud of your work. You have just tackled the black hole of bedrooms, and streamlined your morning routine.
This was a daily issue at my house. It took three times as long to get the kids ready. Digging through drawers to find clothes that fit, rummaging through the toy box for a lost shoe, and, my personal favorite, tearing a room apart to find the lost sippy cup or teddy bear. I needed the space to be workable. My kids needed to be able to find their socks and shoes, have a place for all the toys, and for me not to stub my toe every night at bedtime. Here's how we handle shoes.
The task seemed daunting, and as much as I wanted it done, I continued putting it off. Where should I start? How can I make the most of my space? I made countless drawings of room layouts, toy box placement, and clothing arrangement. I finally devised a plan, and got it all done in a few short hours. The first step was to once again, remove everything. I pulled all the furniture, toys, and clothes out of the room. I needed to start from scratch. The dressers were the easy part. I went to the dollar store and picked up several clear plastic bins.
I designated two drawers to hold all the socks, shoes, underwear, burp rags, bibs and hats. Each bin was labeled and placed in the drawer. I began sorting the mountain of clothes. I had a different bin for each child's socks, all bibs and hats were in one bin, and my burp cloths were neatly folded and easily accessible. It was a dream come true. No more searching for matching socks in the right size. That would cut 10 minutes from day right there!
Then came the toys. I went through all the toy boxes, throwing away anything broken and donating anything the kids didn't play with anymore. You'd be surprised how many toys kids have! All the cheap kids meal toys-gone. Those stuffed animals from three years ago? Gone. I reduced it from 3 toy boxes to 1. This alone would cut clean up time in half. Then it was time for the rest of the clothes. If it didn't fit it went in the donation bin. I had a drawer for pajamas, a drawer for pants/shorts, a drawer for shirts/dresses, and the bottom drawer was things that were still too big but would fit soon. This made my life a lot easier. On to the furniture. All bedding was washed and carefully re-assembled into the masterpiece pictured on the original packaging. I knew it wouldn't stay that way long, but it looked so much better.All furniture was wiped down with disinfecting wipes. I has a small set of plastic drawers on top of the dressers. This held lotions, diaper creams, thermometers, hair bows, and band-aids for easy access. No more hunting down a matching bow or scrambling for a band-aid with a screaming child. My life was getting better by the second. A few decorative pictures and strategically placed stuffed animal and voila! A new clean room for the kids.
You can see our updated toy storage here.
This is where things got tricky. I had to make sure everything was withing my reach, but all cleaning supplies and medicines were safely tucked away. I went back to the dollar store for more bins. This time I opted for mesh and plastic bins with holes. I needed a way to store the bath products and a bin that could still get air, to avoid mold. I got bright colors to match the decor. The first bin held all 600 bottles (or so it seemed) of bubble bath, foam soap, shampoo and shaving creams. The second bin was for bath toys and sponges. We seem to have a growing collection of these. Having them all in one place made bath time easier. The kids could each pick out a toy, or I could dump the entire contents in the tub. After the bath, they would help put them back in the bin and make clean up easier.
Next up was the cabinet space. In our bathroom, we had only a small medicine cabinet behind the mirror. Simply not enough space for a family of five. We got a tall, thin set of Rubbermaid drawers to go next to the sink. Again, safety was the top priority. All razors, medications and other sharp objects went in the highest drawer. In the middle went the hairdryer and other appliances. The bottom drawers were make-up (not what I want the kids playing with, but at least it wouldn't hurt them) and extra soaps, toothpaste/toothbrushes, and hair brushes. On the top "shelf" we had a cup that held everyone's toothbrush and the bottle of toothpaste. We like to have these sitting out as a constant reminder for good oral hygiene. All surfaces were wiped with disinfecting wipes and a few candles made it an inviting space. Everything had a place, and we all knew where to find it. This made mornings and bedtimes slightly easier. As long as you have 5 people and 1 sink, things are always going to be a little crazy.
It make take a day of work, but organizing your house is well worth it. Think about how much time you waste now looking for things and scrambling to get it all together in the morning. Once you've learned the basic steps, you can apply them to any space. Assess the needs of the space, devise a plan and organization system, pull it all out, then only put back what is needed. You can have your home cleaned up and working like it should in no time!
Getting organized is a challenge everyone faces from day to day. Whether it be organizing your house, your closet, your office- something is always in need of a little help. I have been tackling the task of organizing my house, and it's been a long process. I've gathered some tips that may help you get organized once and for all.
Organizing The Closet
This has always been my biggest challenge. I can never find what I am looking for, and often arrive late and disheveled after a frantic search to find the right outfit. I have since re-configured my closet to better suit my needs.Tip #1 - Assess your space. Do you share a closet or are you blessed with a walk-in all your own? Do you have shoes laying all over the floor with no home, or hundreds of empty hangers with clothes scattered around the room? Once you know what the problem is you are better equipped to fix it. If you have an undying love of shoes, invest in a sturdy shoe rack large enough to hold your current stash, with room to grow for your next great find. If you have thousands of t-shirts and only three nice blouses, a hanging organizer may better suit your needs. If you keep all accessories, such as belts, scarves, handbags and jewelry in your closet, consider building a shelf for the handbags, and hanging hooks for belts and scarves. Once you have a basic plan laid out, you can pay more attention to details. Do you want your clothes sorted by season, or perhaps colors? Do you plan in entire outfits or separate pant from tops? If you like to plan in terms of outfits, a few pant hangers will do wonders for your morning routine. Pair the top and pants together, and just grab-and-go in the morning. If you have a varying work schedule, you may want to plan according to the day. You can find closet rod organizers at any mass retailer. See how to make your own simple closet dividers.
If Friday is "Jeans Day" at work, put your favorite pair behind the Friday tag. If you know you have an interview on Tuesday, place your suit behind the Tuesday tag. Whatever system you choose, make sure it works for you. If you know you won't sort through colors when putting laundry away, a color-coded closet won't stay neat for long. If you like to options, chances are a weekly plan of outfits will fall through. See how we organize outfits for the week here. Tip # 2- Take it all out! Once you've decided on a system and bought the necessary supplies, take everything out of the closet. Things are going to get a lot worse before they get better.
Take this opportunity to go through your clothes. If you haven't worn it in a year, get rid of it. I make 3 piles, with three labeled bins. Charity, Trash, Keep. If it's in decent shape, but you just don't love it, put it in the charity bin. There's no need to keep things you won't wear, it's only taking up space. That holey pair of underwear, on the other hand, can go straight into the trash. Only put back in your closet what you know you will wear. If it doesn't fit, and hasn't for a while, toss it.
You don't need a daily reminder of any weight lost or gained. The only things that should be in your closet are clothes you fit and love. Donate everything else (except for those underwear!)
Tip #3- Have your organization system installed before you put anything away. Don't hang up all the clothes then attempt to rearrange the outfits. It will only stress you out and cause more work. Once your system, whether it be daily outfits, types of clothing, or business/casual wear is in place- you're ready to put it all back.
Tip #4- Re-assess. Once everything is put away, take another long look at your closet. Is everything easy to reach? Do you like the organization system and can keep it up? Be proud of your work. You have just tackled the black hole of bedrooms, and streamlined your morning routine.
Organizing the Kids' Rooms
This was a daily issue at my house. It took three times as long to get the kids ready. Digging through drawers to find clothes that fit, rummaging through the toy box for a lost shoe, and, my personal favorite, tearing a room apart to find the lost sippy cup or teddy bear. I needed the space to be workable. My kids needed to be able to find their socks and shoes, have a place for all the toys, and for me not to stub my toe every night at bedtime. Here's how we handle shoes.
The task seemed daunting, and as much as I wanted it done, I continued putting it off. Where should I start? How can I make the most of my space? I made countless drawings of room layouts, toy box placement, and clothing arrangement. I finally devised a plan, and got it all done in a few short hours. The first step was to once again, remove everything. I pulled all the furniture, toys, and clothes out of the room. I needed to start from scratch. The dressers were the easy part. I went to the dollar store and picked up several clear plastic bins.
I designated two drawers to hold all the socks, shoes, underwear, burp rags, bibs and hats. Each bin was labeled and placed in the drawer. I began sorting the mountain of clothes. I had a different bin for each child's socks, all bibs and hats were in one bin, and my burp cloths were neatly folded and easily accessible. It was a dream come true. No more searching for matching socks in the right size. That would cut 10 minutes from day right there!
Then came the toys. I went through all the toy boxes, throwing away anything broken and donating anything the kids didn't play with anymore. You'd be surprised how many toys kids have! All the cheap kids meal toys-gone. Those stuffed animals from three years ago? Gone. I reduced it from 3 toy boxes to 1. This alone would cut clean up time in half. Then it was time for the rest of the clothes. If it didn't fit it went in the donation bin. I had a drawer for pajamas, a drawer for pants/shorts, a drawer for shirts/dresses, and the bottom drawer was things that were still too big but would fit soon. This made my life a lot easier. On to the furniture. All bedding was washed and carefully re-assembled into the masterpiece pictured on the original packaging. I knew it wouldn't stay that way long, but it looked so much better.All furniture was wiped down with disinfecting wipes. I has a small set of plastic drawers on top of the dressers. This held lotions, diaper creams, thermometers, hair bows, and band-aids for easy access. No more hunting down a matching bow or scrambling for a band-aid with a screaming child. My life was getting better by the second. A few decorative pictures and strategically placed stuffed animal and voila! A new clean room for the kids.
You can see our updated toy storage here.
Organizing The Bathroom
This is where things got tricky. I had to make sure everything was withing my reach, but all cleaning supplies and medicines were safely tucked away. I went back to the dollar store for more bins. This time I opted for mesh and plastic bins with holes. I needed a way to store the bath products and a bin that could still get air, to avoid mold. I got bright colors to match the decor. The first bin held all 600 bottles (or so it seemed) of bubble bath, foam soap, shampoo and shaving creams. The second bin was for bath toys and sponges. We seem to have a growing collection of these. Having them all in one place made bath time easier. The kids could each pick out a toy, or I could dump the entire contents in the tub. After the bath, they would help put them back in the bin and make clean up easier.
Next up was the cabinet space. In our bathroom, we had only a small medicine cabinet behind the mirror. Simply not enough space for a family of five. We got a tall, thin set of Rubbermaid drawers to go next to the sink. Again, safety was the top priority. All razors, medications and other sharp objects went in the highest drawer. In the middle went the hairdryer and other appliances. The bottom drawers were make-up (not what I want the kids playing with, but at least it wouldn't hurt them) and extra soaps, toothpaste/toothbrushes, and hair brushes. On the top "shelf" we had a cup that held everyone's toothbrush and the bottle of toothpaste. We like to have these sitting out as a constant reminder for good oral hygiene. All surfaces were wiped with disinfecting wipes and a few candles made it an inviting space. Everything had a place, and we all knew where to find it. This made mornings and bedtimes slightly easier. As long as you have 5 people and 1 sink, things are always going to be a little crazy.
![]() |
| Our bathroom closet in our new house |
It make take a day of work, but organizing your house is well worth it. Think about how much time you waste now looking for things and scrambling to get it all together in the morning. Once you've learned the basic steps, you can apply them to any space. Assess the needs of the space, devise a plan and organization system, pull it all out, then only put back what is needed. You can have your home cleaned up and working like it should in no time!
Monday, January 19, 2015
Toy Storage
If your kids are anything like mine, toy storage is a never ending problem. You want to keep things organized, the kids don't really care. You want them to put away their own toys, they just want to play and have fun.
I needed a toy storage system that would work for all three of my children. It had to hold dolls and cars and an abundance of Legos. My very anal son and I like for everything to be labeled. My oldest son just needs direct orders as where to put things. And my daughter....well, she's determined to ruin any system I try.
I decided on a combination of baskets and buckets to utilize space but also sort the toys. As usual, the hardest part was picking out exactly what I wanted at a price I could afford.
Next I needed medium-sized storage bins for toy categories. Dress up, baby dolls and accessories, and play kitchen items went in these white stackable containers. They are sturdy enough when stacked that they are not likely to get tipped over or fall apart, and the kids can easily pull stuff out and shove stuff back in without knocking them down.
With three different ages, the toy selection can vary greatly. I need smaller containers to hold the numerous sets of smaller items. Matchbox cars, army men, Little People, bey blades, and action figures fit perfectly in these stackable bins. Because the front piece and small and the back is hard to see, these bins were labeled on the bottom inside each one.
And finally, the Lego collection. We have our collection split up in several ways. We have boxes downstairs housing completed display sets, generally the 500-1,000 piece sets of buildings, vehicles, or other special projects. We have a display case to sort all the Lego people, and all the Duplo blocks go in the big tub with the other blocks. I needed a place to store the everyday building Legos, mainly bricks and basic building elements. I wanted it to be short and wide, so the kids could easily see inside without dumping the whole tub. This large snapping tote was just the right fit!
All of them fit in the closet nicely, with ample room to move around and clean up. Please ignore the wall art, my little graffiti demon has left hardly a space untouched by her creativity.
This project was a bit more expensive than most of my others, but each bin can also be rearranged or repurposed later as our needs change.
Large Black Tubs: $4 each.....$12
Medium Stacking Bins: $5.....$15
Small Stacking Bins: 3/$5......$10
Labels I Already Had: $0........$0
Total Cost................................$37
Now the kids have no excuse for a dirty room- they know where everything goes and everything has a specific place!
I needed a toy storage system that would work for all three of my children. It had to hold dolls and cars and an abundance of Legos. My very anal son and I like for everything to be labeled. My oldest son just needs direct orders as where to put things. And my daughter....well, she's determined to ruin any system I try.
I decided on a combination of baskets and buckets to utilize space but also sort the toys. As usual, the hardest part was picking out exactly what I wanted at a price I could afford.
I decided big buckets were best for large and odd shaped toys. All blocks, large cars, and stuffed animals went into these large black tubs. I would have used their specific colors, but I could only find black.
Next I needed medium-sized storage bins for toy categories. Dress up, baby dolls and accessories, and play kitchen items went in these white stackable containers. They are sturdy enough when stacked that they are not likely to get tipped over or fall apart, and the kids can easily pull stuff out and shove stuff back in without knocking them down.
With three different ages, the toy selection can vary greatly. I need smaller containers to hold the numerous sets of smaller items. Matchbox cars, army men, Little People, bey blades, and action figures fit perfectly in these stackable bins. Because the front piece and small and the back is hard to see, these bins were labeled on the bottom inside each one.
And finally, the Lego collection. We have our collection split up in several ways. We have boxes downstairs housing completed display sets, generally the 500-1,000 piece sets of buildings, vehicles, or other special projects. We have a display case to sort all the Lego people, and all the Duplo blocks go in the big tub with the other blocks. I needed a place to store the everyday building Legos, mainly bricks and basic building elements. I wanted it to be short and wide, so the kids could easily see inside without dumping the whole tub. This large snapping tote was just the right fit!
All of them fit in the closet nicely, with ample room to move around and clean up. Please ignore the wall art, my little graffiti demon has left hardly a space untouched by her creativity.
This project was a bit more expensive than most of my others, but each bin can also be rearranged or repurposed later as our needs change.
Large Black Tubs: $4 each.....$12
Medium Stacking Bins: $5.....$15
Small Stacking Bins: 3/$5......$10
Labels I Already Had: $0........$0
Total Cost................................$37
Now the kids have no excuse for a dirty room- they know where everything goes and everything has a specific place!
Posted by
Unknown
at
10:33 PM
No comments:
Labels:
cleaning,
closet,
kids,
organization,
storage,
toys
Mornings Are Hard
Mornings Are Hard
Getting children ready in the morning can be a challenge.
Add in pets to take care of, parents who have to get ready for work, and
differing schedules, and you’ve got a recipe for chaos. Planning ahead is the
key to success. Many people choose to pick out their clothing the night before,
but I can’t always guarantee I will be home at a decent time, or remember to do
it on hectic nights, so I do the entire week at once. It has made mornings so
much easier!
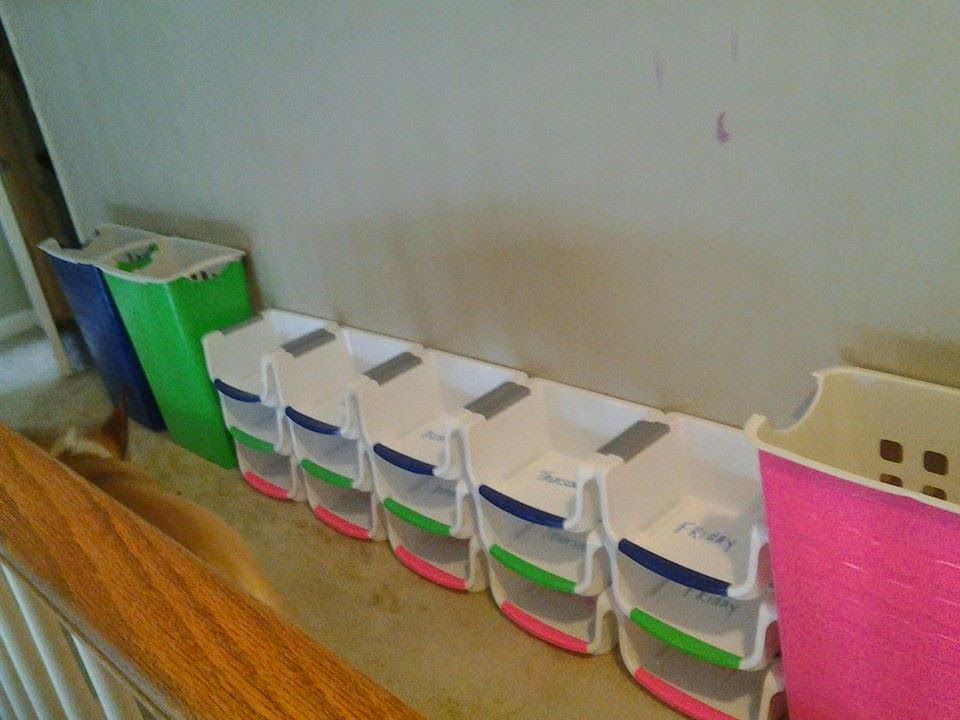
First, I set up a weekly organizer. Finding the right sizes,
colors and quantities were the hardest part of this. I ended up using these
stacking organizers I found in the kitchen section at Wal-Mart. They came 3 in
a pack for about $5, so they were affordable enough to stock up on. I chose to
do only kids’ clothing first, so I needed 15 (3 kids, 5 days). I opted not to
do weekend outfits as we rarely leave the house on weekends. Since I could only
find white bins, I needed to color code them myself. I used a roll of duct tape
in each of their colors and just put a strip on the front. It needed to be
visible when the containers were full, but it wasn’t necessary to cover the
entire bin. I used the leftover tape to identify laundry baskets and other
containers, but more on that later.
On the inside of each bin, I wrote the day of the week. It
only had to be visible when filling the containers, so I just wrote it with a
marker inside.
I then stacked them according to height, and lined them up for the week. This made it easier for my youngest to figure out which one to grab, since she was still learning the days of the week. Everyone grabbed from the same stack on the same day.
In each bin, I placed socks, underwear, pants, shirt, and
matching accessories if needed (bow, belt, etc.). Everything they needed was
ready to go.
We have our shoes in a separate organizer, but you could include them in a weekly clothing organizer if you wished. We no longer spent precious time hunting for the right pieces, and Daddy no longer dressed the children in off-season, ill-fitting clothes.
How it works: as I take clothes out of the dryer, or go
through closets for already put away clothes, I match the outfits and fold them
together. Since I only do Mon-Fri, I have all weekend to get it together. If I
am washing clothes during the week, I will fold the outfits I want and separate
them, and the kids put the rest of the clothes away. This way, when the
organizer is emptied on Friday mornings, I have most everything ready to fill
it for the next week. You could do it all Sunday night, or two weeks at a time,
or whatever works for you. As long as everything is ready to go Monday morning,
you can’t go wrong.
Now enjoy your morning cup of coffee just a little bit
longer, the hard part is done!
Items Used:
Scotch Super Thin Waterproof Vinyl Plastic Colored Tape, .75-Inch by 125-Inch, 5-Pack
Basic White Stacking Bins - 3-pack - 12" X 9" X 5"
Sharpie Fine Point Permanent Markers, 12 Colored Markers(30072)
Items Used:
Scotch Super Thin Waterproof Vinyl Plastic Colored Tape, .75-Inch by 125-Inch, 5-Pack
Basic White Stacking Bins - 3-pack - 12" X 9" X 5"
Sharpie Fine Point Permanent Markers, 12 Colored Markers(30072)
Subscribe to:
Posts (Atom)