Friday, July 31, 2015

Feature Friday: Pure Living Space


Six Things Cooking Geeks Know About Cooking Oils That You Don’t
Cooking Oils 101

Argh! Why is it so confusing to pick the right oil for sauteing, baking or frying? Why is there so little consistency from one source to the next?

There’s so much conflicting advice. Some say to use palm oil while others tout coconut or safflower, and many proclaim the ills of butter. And then there’s the countless smoke point tables, and none match!

You are confused. Heating oil in a frying pan seems fraught with problems, and, of course, everything causes cancer.

But, if you rely on experts who really know their stuff – the real cooking geeks, you’ll be able to saute, bake, broil, braise, fry and roast with confidence.

Here are six things cooking geeks know about cooking oils that you don’t.

1. Cooking geeks understand the difference between Refined and Unrefined Oils  
Refining oil raises its smoke point and lengthens shelf life; it creates a bland flavor and color which can be desirable for some dishes.
You may have heard that refined oils are unhealthy. A study that looked at the health benefits of vegetable oils concluded that there was little evidence to suggest that refining adversely affects the health benefits of vegetable oils.[1] The one exception noted by the study was olive oil. The study found that unrefined olive oil had more health benefits than refined olive oil.
So, based on this study, you can feel good about refined oils for high temperature cooking and your health. And you should use unrefined olive oil as a dressing or drizzle while reserving refined olive oil for cooking.

2. Cooking geeks know that smoke point tables are wrong 
Yep, the smoke point tables are wrong. You shouldn’t believe the hundreds of smoke point tables in cookbooks and online because every oil is different depending on how it was refined, and the cultivation of the raw materials. For instance, some extra virgin olive oil makers list their smoke points from 200 to over 400 degrees.[2]
You can use some helpful guidelines though. Oils with high free fatty acids tend to have lower smoke points because the free fatty acids burn easily. On the other hand, refined oils generally have reduced amounts of free fatty acids and as a result, have higher smoke points.

3. Cooking geeks know the ill-effects of oils above smoke point  
The smoke point is the temperature that causes oil to start smoking which produces toxic fumes and harmful free radicals–all things you’re trying to avoid.
If you’ve set off your smoke alarm, you’ve definitely reached the smoke point. Turn up your exhaust fan and open the windows.
By the way, always try to use your exhaust fan since cooking can create some unhealthy fumes, and your place will simply smell better.

4. Cooking geeks know the effects of reusing or long heat times on oils  
The longer oil is heated, the more free fatty acids are formed causing the smoke point to drop which is why you want to limit deep fryer oil use to once or twice. Prolonged heating also breaks apart unsaturated fatty acids and produces acrid and toxic compounds.[2]
Neither is desirable.
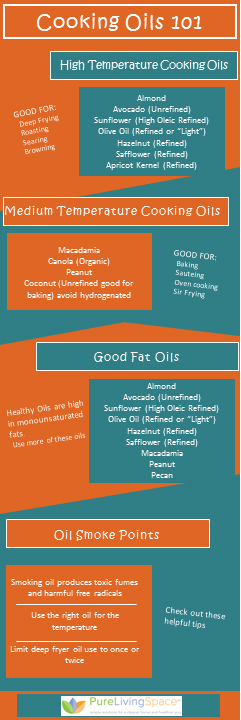
Infographic Cooking Oils 101

5. Cooking geeks know which Oils are high in Omega 3 & Monounsaturated Fats (both good)  
Looking for ways to increase your intake of Omega 3? Try Unrefined Flax Oil (for cold use only) or Hemp Oil.
Here’s your list of the oils with good fats – the monounsaturated oils.
  • Safflower
  • Hazelnut
  • Olive
  • Almond
  • Peanut
  • Pecan
  • Avocado
  • Sunflower
  • Macadamia
6. Cooking geeks know the oils best suited for high temperatures and medium temperatures
Here’s the list you’ve been waiting for. The oils to use safely for cooking without the misleading smoke points.
  • High Temperature Oils (searing, browning, roasting, and deep-frying)
    • Almond
    • Avocado (Unrefined/Raw)
    • Sunflower (High Oleic Refined)
    • Olive oil (Refined or “Light”)
    • Hazelnut (Refined)
    • Tea Seed (Not to be confused with Tea Tree)
    • Apricot Kernel (Refined)
    • Safflower (Refined)
  • Medium Temperature Oils (sauteing, baking, oven cooking or stir frying)
    • Macadamia
    • Canola (Organic)
    • Peanut
    • Coconut (Unrefined good for baking) avoid Hydrogenated
You can lightly saute in Extra Virgin Olive Oil, but you’re best bet is to save the good stuff for dressings, dipping and drizzles.
So, who are these cooking geeks that you can trust?
  • A Chemistry Professor who wrote “What Einstein Told His Cook: Kitchen Science Explained” (seems knowledgeable right?)
  • The Author of The Cooking for Engineers website and about 100 of his contributors (engineers analyze the heck out of everything)
  • The Executive Chef from Cleveland Clinic’s Wellness Institute along with several dietitians (he should know what he’s talking about)
  • A Researcher from the Center for Advanced Nutrition Study – Utah State (this guy conducted a large study of vegetable oils)
  • A Registered Dietitian – Eatingrules.com (this guy has an MS and RD and writes about food for a living)
Do you feel better (wiser, calmer, happier) after reading this article? Sign up for the Newsletter!
Why?
1. Your life will be easier – it’s guaranteed. Twice a month, facts will arrive in your inbox with useful stuff.
2. You’ll be entertained – you’ll find bits of humor sprinkled throughout some of the weightier topics.
3. Your fellow readers all report significant increases in life satisfaction as a result of subscribing (okay, maybe this is going too far…)
So, go ahead and sign up. You’re email is safe with us.


Sources:
1. Health Effects of Commonly Used Vegetable Oils by Michael Lefevre, Center for Advanced Nutrition Utah State University
2. Where There’s Smoke, There’s a Fryer: The Washington Post by Robert L. Wolke Professor Emeritus of Chemistry University of Pittsburgh and author of “What Einstein Told His Cook”
3. Heart Healthy Cooking: Oils 101: Health Hub Cleveland Clinic by James D. Perko, CEC, AAC, Executive Chef for Cleveland Clinic
4. The Cooking Oil Comparison Chart by EatingRules.com and Andy Bellatti, MS, RD,
5. CookingForEngineers.com: Smoke points of various fats and general discussion


ABOUT US

MISSION
Helping people find the safest, healthiest home products and services quickly, easily and with confidence.

BELIEFS
Reducing chemical exposure in homes is critical to good health for all and not just for chemically-sensitive people or young children.
It shouldn't be exhausting or time consuming to find and purchase safe home products and services.
Creating a safer home requires a trusted source of information.
It is not all or nothing. Any step toward a cleaner, safer home will contribute to your health.
Carol & Kelly Trimmer
Pure Living Space

Four years ago, Carol suffered a concussion. It would have been an amusing story if what followed hadn’t been such a nightmare. Carol’s cat liked to ambush her much like Cato and Inspector Clousseau. One day, while bringing in groceries, the cat darted from behind her and tripped her on the stairs. What happened next changed Carol's and her husband Kelly's lives. Months later, she was still trying to recover.
The concussion had triggered a downward spiral that seemed bottomless. In addition to headaches, vertigo, fatigue and brain fog, she began to suffer worsening chemical sensitivities. In the past, only certain smells seem to cause problems like wallpaper, fabric and tire stores. These could be easily avoided.
Now, fragrances, car exhaust, paint, new upholstery, cleaning products, new carpet and even inkjet printed materials were causing problems. The first step was to remove all fragrances from the house including perfume, scented candles, air fresheners, dryer sheets and laundry detergent. It took some time but Carol and Kelly were able to find good, non-toxic alternatives. She also traded in her make up and skin care products for chemical-free alternatives. So far so good.
On the advice of her physician, Carol began drinking filtered water to avoid tap water contaminants. Since bottled water is not ideal, they began investigating water purification options. At this point, they realized that there was a need for simpler resources after spending days and days researching water filtration systems including pitchers, faucet, shower and whole house. There was so much conflicting and incomplete information. For a while, they were so overwhelmed they did nothing. Why did it have to be so difficult?
Then came other needs. Purchasing an organic mattress, safe cookware, effective home air purifier, non-toxic paint and chemical-free furniture all resulted in long, laborious research projects.
As they researched, they were shocked to discover the vast array of chemicals, many known to be toxic that were in so many things they owned.
At this point, Carol and Kelly's friends began asking them for advice and information for a healthier home. That's when Carol, now vibrantly healthy, decided to launch Pure Living Space to help others create a safe and healthy home environment quickly, easily and confidently.
Sign up for Pure Living Space newsletter.

Please follow us on Facebook and Pinterest.


Friday, July 24, 2015

Feature Friday: So So Mom

 
Picture
So here it finally is, my first spring cleaning post!  My blogging schedule is just as haphazard as everything else I do, so it is fitting that my spring cleaning post lags a solid month or two behind everyone else's and implementation of this plan will run well into the first month of summer.
I have finally figured out what almost, kind of, works for me sometimes and might just work for other people because it is more about figuring out yourself than following someone else’s plan.  Guessing you have picked up on my lack of confidence in this post, I am going to begin with a ‘my advice likely won’t work’ disclaimer.  Please be aware that this advice comes from a woman whose children’s bedrooms currently look like this:
As you can see, on a scale of 1-10 my ability to keep a house clean is negative one.  However, most of my advice concerns getting a house clean, which I do much better due to the ample practice seven children provides.  Every year, I start cleaning the kids' bedrooms during the last month of school and then they help me with the rest of the house once school is out.  This may sound backward, but decluttering kid rooms is best done with out the hoarder, I mean child, present.  Keep these tips in mind when you tackle a whole house cleaning overhaul.
Pick your own neurosis, but only ONE.
Mine is laundry.  I have an excellent routine, and I make sure that whatever else I am cleaning does not interfere with that.  In other words, don’t mess up something you are already doing well, in an attempt to do something else better.  However, if you’re unlike me, and there is more than one thing you keep up with well, just pick the one that supplies you with the most ‘sane’ feeling.  After all, cleaning is mostly about maintaining sanity. Weeks that I fail to complete my usual laundry routine are not pretty weeks for anybody!
Don’t be afraid to make a gigantic mess when you are cleaning.
For example, if the entire contents of my closet are on my bed, I have motivation to keep working.  I have emptied the entire contents of my sewing room and storage room into the adjacent rooms and then completely started over organizing.  Each project took about a month, but those rooms were beautiful for awhile after that!  If this sounds completely horrifying to you, go check out the fly lady. She would be horrified too, so maybe she would be perfect for you.  Also, be prepared for your husband to have a strong dislike for this method.  I remind mine that he is welcome to take over anytime and that pretty well ends the conversation.  It appears that my house gets messier and messier as I clean because I pile things to get rid of or take to other parts of the house, out in the open as much as possible in order to reduce the chance they get tucked away somewhere and forgotten.

Use large totes or boxes to throw things into as you go to avoid getting distracted.
There needs to be a place to put absolutely everything right near the area you are working.   Running stuff all over the place is a gigantic waste of time and very distracting.  I know that if I run something to the car and then come back in, I will completely forget what I was doing.

My Cleaning Totes
 ·       
Things That Belong to Others
What ends up in mine?  Grandma's endless supply of tupperware because my family is the garbage disposal of left over holiday food, softball uniforms that were supposed to be turned in 10 months ago, baby paraphenalia I borrowed that the baby has outgrown, the toddler pants I borrowed from a friend because I had an inadequately packed diaper bag, and the five things the last kid who spent the night left behind.
·       
Things That Belong on a Different Floor
This is very important because if I send a child to take something upstairs, they will not return for an hour and then when I finally go hunt them down, I won’t return for an hour, and then a different child will have disappeared, and well, you get the picture.  Mommy ends up angry.
 ·
Things to Sell or Donate
I am considering renting a u-haul to replace this tote.  I struggle to fight the good fight against sentimentality and the what-if-I-need-that scenarios, but we all have to try.

Missing Parts, Pieces, and Mates
This tub started when I found 7 mateless shoes in my storage room and this year I am extending it to include mateless gloves, pieces of toys, battery covers, and any other stuff I know goes to a something that I can’t currently find.  Why the special mention of battery covers, you ask?  I honestly don't know, but they are everywhere!  And, yes, the batteries too.
 ·       
Crap I Can't Decide What to do With
Secretly I also use it for stuff I just don’t feel like dealing with properly right at that moment, but don’t tell my kids.  I don't let them get away with that.  This is a brand new idea this year and I am loving it so far.  I used it when I cleaned my office.  As you saw in the picture, the name was slightly altered.  A child took offense to some of its contents being referred to as crap.  You know what I used to do with things when I couldn’t decide where to put them?  First, I wasted time thinking about what to do with them.  Then, I stuck them in a random place that was all neat and tidy before I stuffed some random junk there. If this sounds like you, I highly suggest a crap box.  The real beauty of it is; it can just stay in there if you never decide.  Just guard it well so a toddler doesn't dump it out and refill it with blocks and then freak out when you dump out those blocks.  Or does that stuff just happen at my house?

Now, here are my two tips for my renewed effort to keep the house clean (er) when we finish the big spring cleaning project this year:

Figure out what you (and your kids) actually do day-to-day that makes the mess and work with it.
I used to buy lidded basket to hide stuff because they are much prettier than open baskets.  The problem is no one in this house, including myself,  will take the two seconds to open a basket.  Result?
Pretty basket with a pile of crap on top of it. Those baskets are mostly being converted to longer term storage purposes rather than day to day use.  I am resigning myself to piles of shoes, which is less irritating than piles of shoes on top of baskets.  Now I am going to think about the places where we tend to throw stuff and create a mess and think of a solution that we might be more likely to use.  For example, there are usually jackets and bags mixed into the aforementioned pile of shoes, so I am putting up more hooks.  Amazingly, four of six children who are old enough, will put stuff on the hook instead of on the floor under the hook.  Those are excellent odds here.  I tried to limit the hooks because I would rather the kids each keep only one bag and jacket on one hook and take extras to their bedrooms.  Hahahaha, I know, like I said, more hooks.

Don’t lie to yourself about changing habits.
I have insisted to myself for fifteen years that I am going to start putting my shoes away  properly, but I've been lying to myself.  I could also tell myself that I am going to make the kids tidy up the basement every single week, but I would be lying to myself.  I could vow to hunt down every child every time they threw a something on the floor that didn't belong and make them pick it up right away, but I would be lying to myself.  My new plan for my closet is an open shoe basket just outside for the most-worn shoes.  I finally realized it is just stupid to line my shoes up neatly on the floor of my closet twice a year just so they can end up in a pile in front of it within two weeks.  My kids will be outside as much as possible after the house is clean.

Pick a very teensy, tiny simple habit to change and schedule it.
I am terrible at changing habits, but I know it is possible.  Instead of lying to myself about changing a whole slew of them, I am carefully comtemplating one to change.  I haven't come up with it yet; I will keep you posted.  When I do I am going to use my phone to remind me to keep it up.

I know you are wondering how and when I am going to implement all this.  That is next week's post, well, my next post anyway.  I have 17 days to finish cleaning all the bedrooms.  In the meantime, what habits are you lying to yourself about?  Do you have any habit change suggestions for me?

Love this?  Try this:


Author

I am the mother of seven children ranging from teens to a baby, living out in the middle of nowhere, USA.  I aim to hone the craft of giving advice without pretending to have this whole mom thing figured out.  I am Christian, but not the really nice kind that is good at it.  I am also conservative, but I promise not to be in your face with political agendas very often.  I like to infuse humor into my writing, so don't freak out if you are offended or appalled by what you read here.  It might me a joke!


Friday, July 17, 2015

Feature Friday: Mrs. Sheets & Co

Banana Nut Muffins

Ingredients:

    2 cups all-purpose flour
    1 1/2 teaspoons baking soda
    1/2 teaspoon salt
    4 overripe bananas
    1 cup brown sugar
    3/4 cup (1 1/2 sticks) unsalted butter, melted and cooled
    2 eggs
    1 teaspoon pure vanilla extract
    1/2 cup pecans, chopped

Directions:
Preheat oven to 375 degrees F and lightly butter 2 muffin tins.

In a large bowl, combine the flour, baking soda, and salt; set aside.

Mash 2 of the bananas with a fork in a small bowl so they still have a bit of texture. With an electric mixer fitted with a wire whisk, whip the remaining bananas and sugar together like you mean it, for a good 3 minutes.

Add the melted butter, eggs, and vanilla and beat well, scraping down the sides of the bowl once or twice.
Mix in the dry ingredients just until incorporated. Fold in the nuts and the mashed bananas with a rubber spatula. Spoon the batter into the muffin tins to fill them about halfway. Give them a rap on the counter to get any air bubbles out.

Bake until a toothpick stuck in the muffins comes out clean, 18 to 20 minutes. Let cool for a few minutes before turning the muffins out. Serve warm or at room temperature.


 ABOUT:
Hi! I'm Randi Sheets
I am the Chief Organizer, Housekeeper & Chef for the Sheets' household. I can work a drill and an evening gown. I have created a blog to share everything I love from crafts, DIY projects, products, recipes & of course my experiences. Please check out some of my favorite and sometimes my not so favorite things.
 

Ingredients:
  • 2 cups all-purpose flour
  • 1 1/2 teaspoons baking soda
  • 1/2 teaspoon salt
  • 4 overripe bananas
  • 1 cup brown sugar
  • 3/4 cup (1 1/2 sticks) unsalted butter, melted and cooled
  • 2 eggs
  • 1 teaspoon pure vanilla extract
  • 1/2 cup pecans, chopped
- See more at: http://mrssheetsandco.blogspot.com/2015/05/banana-nut-muffins.html#sthash.ndZn4qpm.dpuf
Ingredients:
  • 2 cups all-purpose flour
  • 1 1/2 teaspoons baking soda
  • 1/2 teaspoon salt
  • 4 overripe bananas
  • 1 cup brown sugar
  • 3/4 cup (1 1/2 sticks) unsalted butter, melted and cooled
  • 2 eggs
  • 1 teaspoon pure vanilla extract
  • 1/2 cup pecans, chopped
Directions:
Preheat oven to 375 degrees F and lightly butter 2 muffin tins.

In a large bowl, combine the flour, baking soda, and salt; set aside.

Mash 2 of the bananas with a fork in a small bowl so they still have a bit of texture. With an electric mixer fitted with a wire whisk, whip the remaining bananas and sugar together like you mean it, for a good 3 minutes.

Add the melted butter, eggs, and vanilla and beat well, scraping down the sides of the bowl once or twice.
- See more at: http://mrssheetsandco.blogspot.com/2015/05/banana-nut-muffins.html#sthash.ndZn4qpm.dpuf

Banana Nut Muffins


Ingredients:
  • 2 cups all-purpose flour
  • 1 1/2 teaspoons baking soda
  • 1/2 teaspoon salt
  • 4 overripe bananas
  • 1 cup brown sugar
  • 3/4 cup (1 1/2 sticks) unsalted butter, melted and cooled
  • 2 eggs
  • 1 teaspoon pure vanilla extract
  • 1/2 cup pecans, chopped
Directions:
Preheat oven to 375 degrees F and lightly butter 2 muffin tins.

In a large bowl, combine the flour, baking soda, and salt; set aside.

Mash 2 of the bananas with a fork in a small bowl so they still have a bit of texture. With an electric mixer fitted with a wire whisk, whip the remaining bananas and sugar together like you mean it, for a good 3 minutes.

Add the melted butter, eggs, and vanilla and beat well, scraping down the sides of the bowl once or twice.

Mix in the dry ingredients just until incorporated. Fold in the nuts and the mashed bananas with a rubber spatula. Spoon the batter into the muffin tins to fill them about halfway. Give them a rap on the counter to get any air bubbles out.

Bake until a toothpick stuck in the muffins comes out clean, 18 to 20 minutes. Let cool for a few minutes before turning the muffins out. Serve warm or at room temperature.


- See more at: http://mrssheetsandco.blogspot.com/2015/05/banana-nut-muffins.html#sthash.ndZn4qpm.dpuf

Friday, July 10, 2015

Feature Friday: The Ham and Cheese Of It

Food In Review: Cookie Dough Filled Cupcakes

Friday, June 12, 2015

I know you've probably heard me talking about the most amazing cupcakes ever to walk on the face of this Earth. I am not kidding. I am a glorified cupcake snob. I have asked for refunds on cupcakes after taking one bite to find them dry, stale or for false advertising. I despise it when cupcakes aren't what the bakers say they were. I mean if I wanted a pancake cupcake with a bacon flavored frosting I want it. Period. Anything less than cupcake perfection, to me, is a deadly sin. Especially, if I am going to fork over $5 for one. 
But, my dear friend, April over Sweet Madness likes to use me as a taste tester. Which, personally, I am not mad about it. Even if my waist line is. A few months back, at the beginning of May, she said she wanted to try her hand at baking. I was all for it! Especially, when she said she wanted to get crafty with her baking. Her plan was to create amazing cupcakes for her daughters first birthday.
I personally think she succeeded in not only raising my cupcake expectations, but she also mastered the art of creative cupcakes. The center is a perfect bite of chocolate chip cookie dough. The icing and cupcake breading isn't too sweet either. Because, nothing screams wastefulness when you have scrape half the icing off simply because it is as if liquid sugar had been injected into it.
Now to make these AMAZING cupcakes. April uses multiple recipes from different sources. She then combines them to create these wonderful cookie dough filled cupcake. For the cupcake itself she used the recipe from Midget Momma  to create a more soft and less sweet cupcake that wouldn't be overpowered by the heavy sweetness of the chocolate chip cookie dough. I was surprised when reading the blog on Sweet Madness, that Midget Momma, uses sour cream in her batter! How neat and creative is that?
I am happy to say that, when it came to the cookie dough portion of this recipe, she used my FAVORITE chocolate chip cookie recipe. This William-Sonoma Recipe is by far the best I have ever had. I personally use this recipe nearly every week. In fact not only do I have four rolls hidden in my freezer but I even did a Food In Review of the recipe itself. 
Now I am happy to say that the chocolate buttercream icing is of her own creation. The icing is the perfect touch to these handcrafted pieces of deliciousness. My taste buds aren't over powered by the sweetness of the icing and it always leaves me wanting just one more bite! April's ability to include my favorite cookie recipe and include my horrible, bad addiction of cupcake eating has left me beyond satisfied. Or as Marie Antoinette was falsely accused of saying, "LET THEM EAT CAKE!" as she stuffed another one down her throat. 

If you would like the full tutorial on how to make these cupcakes please check out April's blog at www.sweet-madness.net 


About Me


Hi! I am Trisha!


Hello New Friend! I am so excited that you took the time out of your busy day to come by The Ham & Cheese Of It. It fills me with such joy to know that you took a moment to read, share, comment or like my blog. It's such a wonderful feeling to know that you and I are going to be the best of friends!

Well, New Friend, let me take a moment to tell you a little bit more about me and my blog. I know you're just dying to know the girl that wrote that recipe or posted that VERY interesting blog post. 

To start off let me tell you that I am newbie stay at home mom to the most wonderful little girl in the world. Everyday she shows me exactly why my mother always used to say, "just you wait until you have a daughter of your own". She's a handful and a half and I wouldn't have it any other way. She makes every day exciting and new.


Originally my little family is from North Texas. A beautiful, wonderful place where you can go to Walmart at 2 o'clock in the morning for whatever you might possibly need. A place where there is a Sonic Drive-In on nearly every major street. Texas, the land of endless comforts. Sigh. I miss Texas. It will always be our home. But because of my husbands job we get the pleasure to live around the world. You probably are trying to figure it out. What kind of job is that? I want a job that lets me live around the world. Where can I sign up? Well it's pretty easy. Join the Air Force. They're always looking for new recruits! Yes, we are a military family living the military dream. Currently we are stationed in a small province of Tokyo, Japan. However, in November of 2015 we are uprooting our family to Germany.


These last few years in Japan have been amazing and I can't wait to share my experiences that I have had here with you. I also can't wait to share our next big adventure with you as well. It will be so wonderful sharing everything that I learn in Germany and the surrounding countries with you, new friend. 


Over the last three years my husband and I have adopted two crazy labs. Bo, is our oldest and most well behaved member of our furbabies. He's actually a mix that my father adopted for me back in Texas from our local animal shelter. He was this scrawny five month old border collie/lab mix puppy that just wanted to hide in my hair. But now he's a very well behaved three year old who loves carrot/ peanut butter dog treats and snuggle time.

Our youngest furbaby and newest house hold addition is our pure bred chocolate lab O'Hana. Her name is Hawaiian for "Family" and sometimes I glad she's named that. I always need a good reminder that she is, in fact,"family" and I can't just leave her at the fire station. Still being a young puppy and adopting her here in Japan, O'Hana has been... well very much like Marley from Marley and Me. She's slowly turning in to a very well behaved dog. But it's sure is taking some time! She loves digging into water (no idea why water) and eating everything she can get her mouth on. Especially my husbands work socks (GROSS). But we love her obnoxious self all the same.


Just so you know friend, I love to cook. I LOVE it. It's the kind of art that can leave a lasting impression on some one for years. Food, with it's sultry beauty, can leave a person in so many different states of self. When I was younger my Grandmother used to make the best spaghetti sauce. The kind that would cook all day and make the house smell like bay leaves and love. Now, twenty years later, whenever I smell bay leaves or her spaghetti sauce I am immediately taken back to those childhood days spent running around her house. 

Food is a reminder of happier and joyful times. Food is a comfortable embrace that is always waiting for you. I love food. That is why I write, post and create food to share with all of you! At the end of the day, food, will always be there for you.

I also, seriously enjoy trying out Pinterest recipes, and seeing if they really work or if there is something about it that can be changed. Because sometimes I don't need THAT much cream in my pasta when Greek Yogurt will work just as well. If you want to check out my pinterest recipes that I have tried and that do work, check out my pinterest page here. Now, dear friend of mine, if you have tried something different than what I or the other blogger did please let us all know! I love feed back and always want to know your thoughts.


Just as a reminder this blog is in general a place for me to collect my experiences. Either it be by traveling the world and trying out new recipes.  Sometimes this blog will be about trying to become a healthier me, sometimes it might be about my family or my dogs. This blog is about my crazy, crazy wonderful life. I can't WAIT to share my adventure with you friend!


Wednesday, July 8, 2015

DIY Craft Table Remodel

My husband had been talking about getting me a craft table for months. We scoured Craigslist and thrift stores but couldn't find anything to fit our space and budget. We finally stopped looking and decided to just put the idea on hold.


A couple weeks ago, as I was sprawled out on the bedroom floor painting, we decided I needed some kind of work area.We had very little available space and even less room in the budget. So I went hunting in the garage for extra pallets, spare parts, anything I could turn into a small table. Then, I spied my old nightstand. It was close to twenty years old and had seen better days, but was small enough I could squeeze it into my bedroom corner. It would have to do.

Hubby sanded it all down, stripped the hardware, and smoothed out the edges. We used a couple cans of spray paint we had from another project, and gave it a couple coats of clear sealant.

It was perfect, so easy, and very cheap. We cleaned out a corner in my bedroom and pulled up a chair. I now have a small surface that matched my decor and can house most of my craft supplies.