Organizing a laundry room can be a challenge for many families. The biggest issue is having enough space. When I sat out to revamp my laundry room, I took to Pinterest. I quickly became disappointed as everyone seemed to have giant laundry rooms. Our old house had no laundry room, just the washer and dryer set up in the kitchen, with no doors or even a way to hide it with a curtain. When we moved here, I fell in love with the laundry room. It seemed very spacious, was tucked away in a corner, and had a door to hide all my dirty clothes.
Then I started putting stuff in the laundry room. It got smaller by the minute.
Finding a good inspiration for my laundry room was nearly impossible. Everything was either for tiny laundry closets or what seemed like laundry mansions. I had to get creative.
As with all my projects, it started with a list. What did I absolutely need to have in there? What would be nice to have? What were my problem areas that needed a little help? Once I figured out a general idea of what I needed and wanted, I set out to find products to fit my needs.
I knew I wanted more storage, but finding something to fit in the space was a challenge. I ended up getting an old dresser and cutting a piece of the back corner off so it would fit properly. I had originally just stuck it between the washer and dryer, but then inevitably stuff would fall behind it and I would have to pull everything out to reach it. Cutting it wasn't my first thought, and certainly not the prettiest solution, but without the help of my husband or power tools, it got the job done. Now it serves a purpose without creating more hassle for me later.
What exactly to put in each drawer and how to organize it required a little thought, but I went back to my list and assessed my needs and wants. Suddenly I knew just what I wanted to do.
Laundry Supplies. Between making my own laundry detergent and dryer sheets, and all the various products we keep around, I needed a place to store them all without piling them on my valuable shelf space. The top drawer was the perfect place to hide everything but keep it accessible.
Cleaning Supplies. Again, I make my own and have a plethora of products on hand. All those little items needed a home, but I needed them in reach of my kids. Now when they get ready to do their chores, they don't have to hunt for the right supplies or ask for help to get them down from the shelf.
Dog Supplies. We don't have a ton of pet stuff, but the extra leash, training pads for car rides, and grooming supplies needed a home. Half a drawer was plenty of space, and she couldn't get to it to chew on everything.
Cleaning Rags. I love rags. I have tons of them. Microfiber for cleaning, larger ones for kitchen messes, and a giant pile of perfectly-12-by-12 white rags for hygiene and grooming. I also like to keep them separate. Now all of my cleaning rags are together, and near the cleaners, for easy access and use.
Outgrown Clothes. I've used many different systems over the years to deal with outgrown clothes. When my oldest son outgrows something, I keep it for my younger son. But when my younger two outgrow things, I pass them on to friends. Giving them one shirt at a time doesn't make much sense, but having piles of old clothes around isn't ideal either. A drawer in the laundry room was the perfect solution. Once the clothes come out of the dryer, they get sorted. When I see something that has been outgrown or was looking a little too tight last week, I fold it and put it in the drawer. When the drawer gets full, I move my son's clothes to keep to a tote in the garage, and the others I give to a friend. Now I have an empty drawer and can start all over. The clothes are handy (which is great for when our friends come to visit and need an extra change of clothes or jacket on cool nights), but out of the way and organized. Everything is clean, folded, and ready to go. I think this is my favorite part of my laundry room.
Then comes the actual laundry. There are six people in my home. Two adults with very messy jobs. Three kids who love to get dirty. Two kids who still wet the bed. A dog that has a mind of her own. And a Mommy who has to clean up after it all. We have a LOT of laundry. We used to spend hours sorting everything before we washed, only to have it ruined when the clean clothes piled up because I hadn't had time to put them away. Now, everyone has their own dirty AND clean laundry basket. My roommate keeps his stuff in his room, so his laundry doesn't end up mixed in with everyone else's.
I opted for one of the laundry sorters with a hanging rack. This makes the entire process much easier. I can hang dry items as needed, and I have a place to hang up clean clothes when I folding and putting everything away. My ironing board is mounted to the back of my laundry room door, so it's easy to hang up freshly ironed clothes. Each person has their own basket, and of course, everything is labeled in the correct color. We have a "house" basket for towels, sheets, and blankets. We have tons of towels and they really needed their own place.
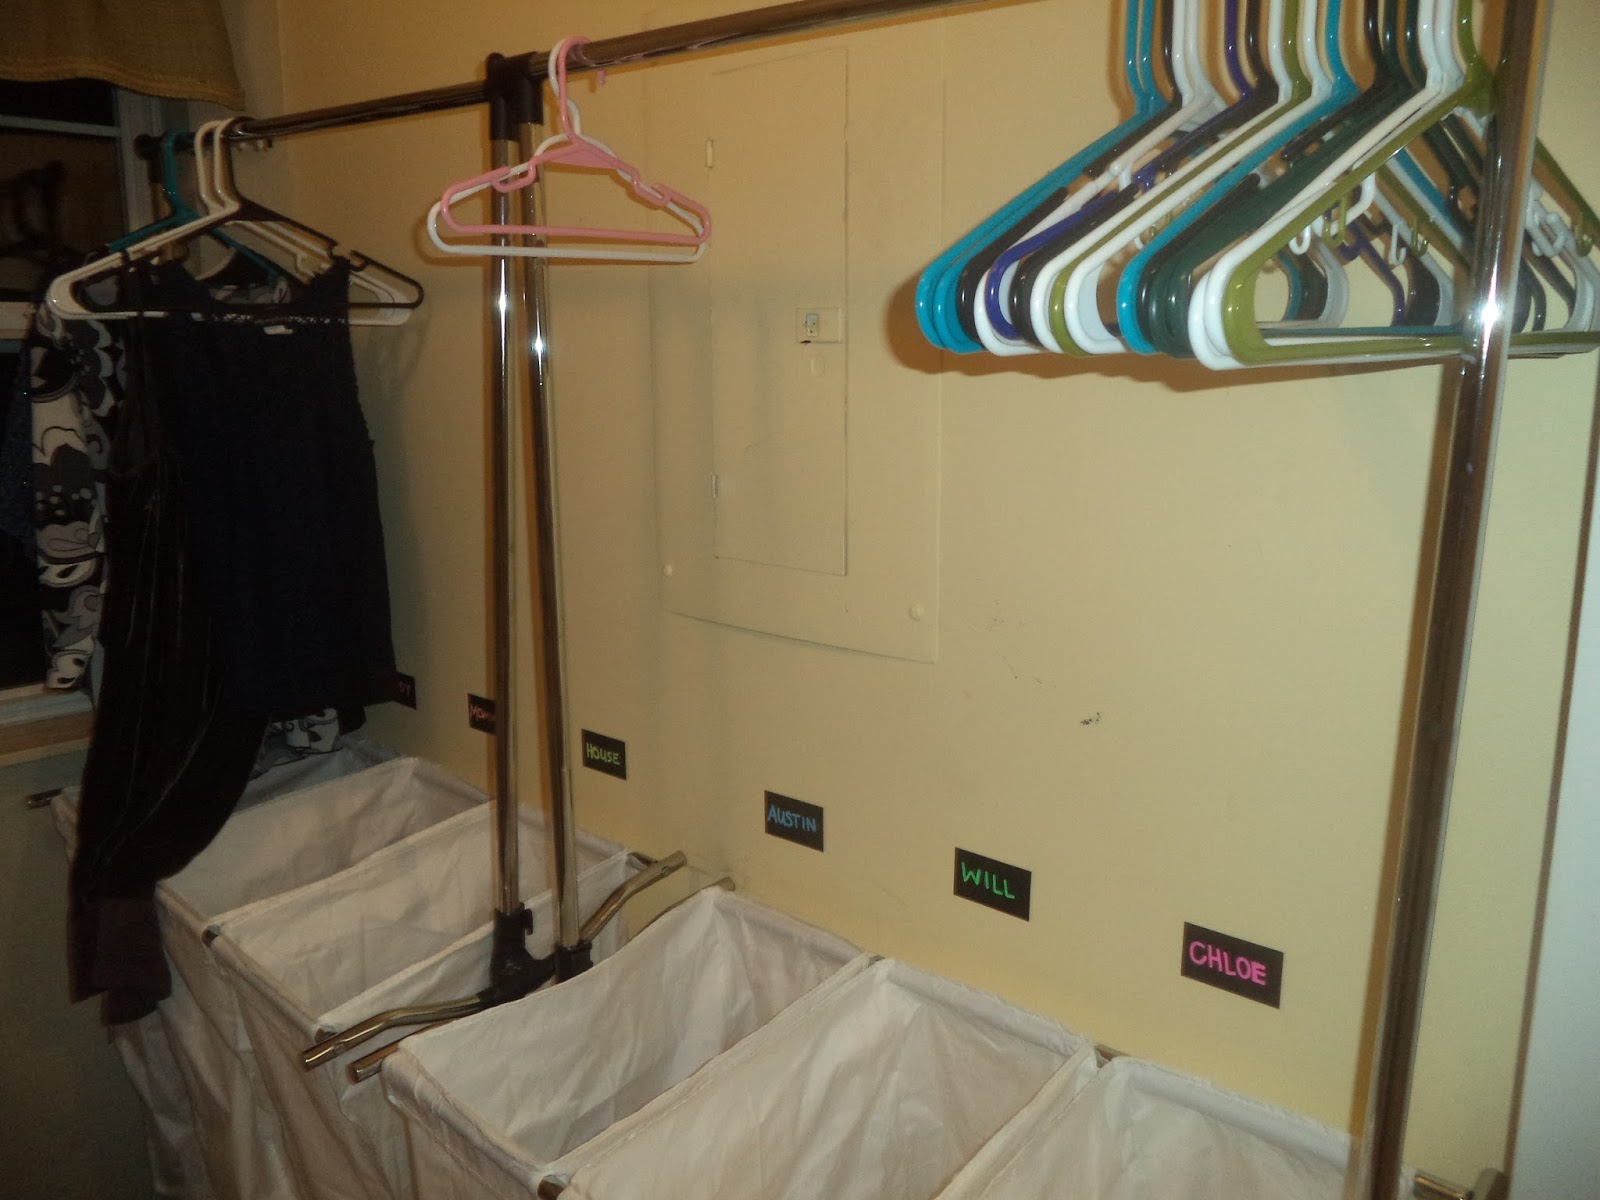
(Almost) everyone puts away their own laundry. My youngest needs a little help, and I take care of mine and my husbands. My oldest son and I take turns with towels and blankets. This system makes my life so much easier. Everything is sorted before and after washing, which makes finding mates to socks and the right person's underwear much simpler. When it's time for clothes to be put away, each child takes their basket to the living room where they can spread out, and they hang up or fold all their clothes and get them put away. The clean baskets go back on the frame. I have an extra bag or two in case one tears or needs washing. I keep my hanger holders next to the baskets in the laundry room, so there's no running around and hunting for anything when it's time to work- everything is at hand.
Limited shelf space. This is a problem in most laundry rooms, I'm sure. I have one really long shelf, which is wonderful at times. But it's not very deep and one bottle of laundry detergent is about all you can squeeze on there. I keep all my detergent on one side, then the occasional bottle of bleach or fabric softener in the middle. My big boxes of detergent supplies hide in the corner, since they only get used every few weeks. This is where I utilize the top of the dresser. I keep a small trashcan for lint and the inevitable stickers my daughter puts everywhere. I have a small bin for found items in the dryer or pockets, belts, and other items that shouldn't go through the wash. When the laundry is done, I move belts and clothing items to clean laundry baskets, and have the kids return the other items to their proper homes.
Finishing touches and little details. I wish I had more space to add decorations and make it look nicer, but you work with what you've got. I keep a measuring cup hanging by the washer for detergent, along with a list of instructions and sizes for when somebody is helping out, like my son or husband. A couple "plants" in the window, okay, just pretty pots with some dead grass. I have a black thumb and none of my laundry room plants survived. I use a marker to label settings on the washer for my son, it comes right off with a magic eraser when I clean the machine. A hook for the giant lint-trap cleaning brush. A small set of tools for quick fixes. One of these days I'll make some decor to tie it all together.
And that's it! An organized laundry room with everything I need to keep my family clothed. Do you have any tips to add? Is your laundry room in need of some help or is it more like those laundry mansions on Pinterest?
Showing posts with label laundry. Show all posts
Wednesday, October 14, 2015
Monday, July 6, 2015
Homemade Laundry Detergent Recipe
I know there are hundreds of laundry detergent recipes out there, and most of them use the same basic ingredients. And mine really isn't that different. But mine is a tad stronger, and with a couple extra ingredients.
You see, my husband paints at work. I'm not talking painting walls with latex paint in which coveralls could shield his clothing from damage. I'm talking powder coating. They use these high-powered air brush guns to spray powder coat on metal parts. No matter how much protection he attempts to wear, he comes home covered in black paint, head to toe. This paint is also reactive with bleach and other chemicals, making homemade detergent even more necessary. But the paint isn't confined to his work clothes. Aside from everything he wears, right down to his socks covered by his boots, it gets in his skin. He comes home every night and immediately gets in the shower, thoroughly scrubbing the top layer of his flesh off. But it's not enough. Inevitably, when he gets out of the shower, there will still be paint trapped in his pores, eyes, nose, ears, eyebrows, and beard. So the paint ends up on the towel. Then he needs a wash rag (or two) to continue scrubbing his face before I'll let him come near my pretty white pillows. The paint and associated chemicals can be hard on the skin, but he is used to it. The children are not. Therefore, all his clothes must be washed separately and the washer cleaned and sanitized before another load can go in.
And did I mention our roommate works there as well, so he also comes home covered in paint?
I needed a stronger detergent, but no more chemicals.
I tend not to do things the conventional way, so exact measuring of the water doesn't really happen. I eyeball it.
2 Cups Borax
2 Cups Washing Soda
2 Cups OxiClean
1 Cup Baking Soda
*1/2 to 1 Bottle Fragrance or Softener Bits
*This part is optional, but my husband has a thing about clothes smelling like SOMETHING, so my normal "clean" smelling detergent wasn't enough. I started adding essential oils or those in-wash scents. Just go with what you feel.
2. Boil some water. Again, I'm not really precise with the water. It all evens out in the end. Once the water is hot, melt the soap. Or be lazy like me and put the soap in right away then bring the water to a boil. Just remember to stir often to keep it from sticking and burning, and to help it melt consistently. If you are using the in-wash scent boosters, melt them in with your soap.
3. Mix your dry ingredients. I usually do this while the soap is melting. Grab a five gallon bucket, empty tote, whatever big container you have around. I'm using a 20 gallon tote, and I just eyeball where half would be to make 10 gallons of detergent.
4. Once the soap is liquid with no chunks, add it to your dry ingredients. Mix well for a minute before adding more water to ensure all the dry ingredients get incorporated.
5. Add more water and keep stirring. I do a combination of hot and cold water, do whatever you like. After I dump the melted soap, I just fill the pot with more water and put it back on the stove. The hotter the water the easier it is to mix everything and dissolve the powders. Again, I'm lazy. I attach a stirring rod to our cordless drill and just stand there a minute while it does all the hard work. Just keep it on a low speed to avoid a lot of splatters.
6. Let cool to thicken then divide into desired containers. Some people have limited space by the washer and choose to only fill one bottle at a time. So just keep the bucket in the laundry room and scoop from each it time. That doesn't work for me. I have these lovely plastic jugs** I fill with the detergent. Mine are gallon size, but you can get them in different sizes to fit your needs. I, of course, have mine labeled. I have a large shelf above my washer to stack up all my jugs. You can always hide extras in the garage and pull them out as needed.
And you're done! I do very large loads so I use about a cup per load. You can play around with it and see what works for you. I'm generally trying to get paint or urine-soaked clothing clean, so I need the full cup. You might be able to get by with less. Ten gallons may last some people a very long time, perhaps even a year. Not in my house. It lasts about 6 weeks at best. We do a lot of laundry. I buy all the ingredients in bulk on Amazon so they're always on hand and it saves me money. I spent probably $25 on all the ingredients, and could make this size batch about 6 times with enough ingredients left over to make a few homemade cleaners. That's 60 gallons of laundry detergent for just $25! And you could do it for less if you didn't add all the extra stuff. But I'm happy with that amount.
**If you would like to purchase the ingredients, the gallon jugs used, labels, or any other products I've shown, check out the amazon store to the right. -----> I try to add each product I use, and it shows only the products I've added. You may be able to find them cheaper elsewhere, but it will at least give you an idea of what I'm working with. Any time I show a product, I try to add it to the UNperfect Family Amazon Store so you can purchase it or compare it with local items. Many items you can find at the dollar store, and larger cities may have more local options. I prefer to shop from home.
You see, my husband paints at work. I'm not talking painting walls with latex paint in which coveralls could shield his clothing from damage. I'm talking powder coating. They use these high-powered air brush guns to spray powder coat on metal parts. No matter how much protection he attempts to wear, he comes home covered in black paint, head to toe. This paint is also reactive with bleach and other chemicals, making homemade detergent even more necessary. But the paint isn't confined to his work clothes. Aside from everything he wears, right down to his socks covered by his boots, it gets in his skin. He comes home every night and immediately gets in the shower, thoroughly scrubbing the top layer of his flesh off. But it's not enough. Inevitably, when he gets out of the shower, there will still be paint trapped in his pores, eyes, nose, ears, eyebrows, and beard. So the paint ends up on the towel. Then he needs a wash rag (or two) to continue scrubbing his face before I'll let him come near my pretty white pillows. The paint and associated chemicals can be hard on the skin, but he is used to it. The children are not. Therefore, all his clothes must be washed separately and the washer cleaned and sanitized before another load can go in.
And did I mention our roommate works there as well, so he also comes home covered in paint?
I needed a stronger detergent, but no more chemicals.
I tend not to do things the conventional way, so exact measuring of the water doesn't really happen. I eyeball it.
Ingredients
1 Bar Zote (14oz)2 Cups Borax
2 Cups Washing Soda
2 Cups OxiClean
1 Cup Baking Soda
*1/2 to 1 Bottle Fragrance or Softener Bits
*This part is optional, but my husband has a thing about clothes smelling like SOMETHING, so my normal "clean" smelling detergent wasn't enough. I started adding essential oils or those in-wash scents. Just go with what you feel.
How To
1. Shred the soap. Melt it in the microwave. Cut it into chunks and pop it in the food processor. However you want to do it is fine. I just do it with a cheese grater. The smaller the pieces, the easier it melts. It's up to you how you get it that way.2. Boil some water. Again, I'm not really precise with the water. It all evens out in the end. Once the water is hot, melt the soap. Or be lazy like me and put the soap in right away then bring the water to a boil. Just remember to stir often to keep it from sticking and burning, and to help it melt consistently. If you are using the in-wash scent boosters, melt them in with your soap.
3. Mix your dry ingredients. I usually do this while the soap is melting. Grab a five gallon bucket, empty tote, whatever big container you have around. I'm using a 20 gallon tote, and I just eyeball where half would be to make 10 gallons of detergent.
4. Once the soap is liquid with no chunks, add it to your dry ingredients. Mix well for a minute before adding more water to ensure all the dry ingredients get incorporated.
5. Add more water and keep stirring. I do a combination of hot and cold water, do whatever you like. After I dump the melted soap, I just fill the pot with more water and put it back on the stove. The hotter the water the easier it is to mix everything and dissolve the powders. Again, I'm lazy. I attach a stirring rod to our cordless drill and just stand there a minute while it does all the hard work. Just keep it on a low speed to avoid a lot of splatters.
6. Let cool to thicken then divide into desired containers. Some people have limited space by the washer and choose to only fill one bottle at a time. So just keep the bucket in the laundry room and scoop from each it time. That doesn't work for me. I have these lovely plastic jugs** I fill with the detergent. Mine are gallon size, but you can get them in different sizes to fit your needs. I, of course, have mine labeled. I have a large shelf above my washer to stack up all my jugs. You can always hide extras in the garage and pull them out as needed.
And you're done! I do very large loads so I use about a cup per load. You can play around with it and see what works for you. I'm generally trying to get paint or urine-soaked clothing clean, so I need the full cup. You might be able to get by with less. Ten gallons may last some people a very long time, perhaps even a year. Not in my house. It lasts about 6 weeks at best. We do a lot of laundry. I buy all the ingredients in bulk on Amazon so they're always on hand and it saves me money. I spent probably $25 on all the ingredients, and could make this size batch about 6 times with enough ingredients left over to make a few homemade cleaners. That's 60 gallons of laundry detergent for just $25! And you could do it for less if you didn't add all the extra stuff. But I'm happy with that amount.
**If you would like to purchase the ingredients, the gallon jugs used, labels, or any other products I've shown, check out the amazon store to the right. -----> I try to add each product I use, and it shows only the products I've added. You may be able to find them cheaper elsewhere, but it will at least give you an idea of what I'm working with. Any time I show a product, I try to add it to the UNperfect Family Amazon Store so you can purchase it or compare it with local items. Many items you can find at the dollar store, and larger cities may have more local options. I prefer to shop from home.
Monday, January 19, 2015
Mornings Are Hard
Mornings Are Hard
Getting children ready in the morning can be a challenge.
Add in pets to take care of, parents who have to get ready for work, and
differing schedules, and you’ve got a recipe for chaos. Planning ahead is the
key to success. Many people choose to pick out their clothing the night before,
but I can’t always guarantee I will be home at a decent time, or remember to do
it on hectic nights, so I do the entire week at once. It has made mornings so
much easier!
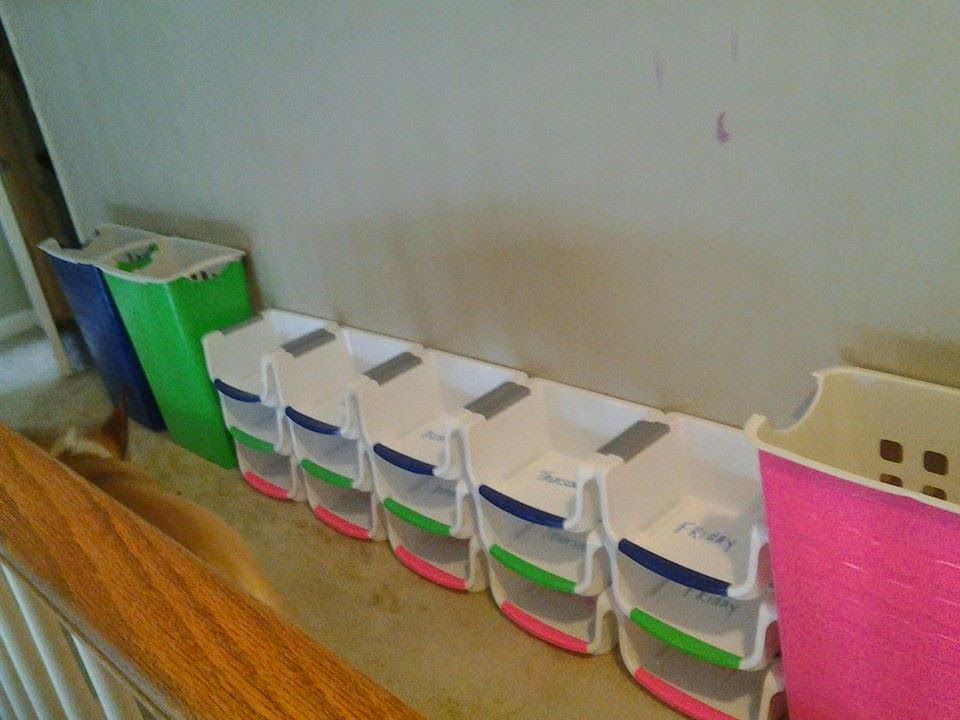
First, I set up a weekly organizer. Finding the right sizes,
colors and quantities were the hardest part of this. I ended up using these
stacking organizers I found in the kitchen section at Wal-Mart. They came 3 in
a pack for about $5, so they were affordable enough to stock up on. I chose to
do only kids’ clothing first, so I needed 15 (3 kids, 5 days). I opted not to
do weekend outfits as we rarely leave the house on weekends. Since I could only
find white bins, I needed to color code them myself. I used a roll of duct tape
in each of their colors and just put a strip on the front. It needed to be
visible when the containers were full, but it wasn’t necessary to cover the
entire bin. I used the leftover tape to identify laundry baskets and other
containers, but more on that later.
On the inside of each bin, I wrote the day of the week. It
only had to be visible when filling the containers, so I just wrote it with a
marker inside.
I then stacked them according to height, and lined them up for the week. This made it easier for my youngest to figure out which one to grab, since she was still learning the days of the week. Everyone grabbed from the same stack on the same day.
In each bin, I placed socks, underwear, pants, shirt, and
matching accessories if needed (bow, belt, etc.). Everything they needed was
ready to go.
We have our shoes in a separate organizer, but you could include them in a weekly clothing organizer if you wished. We no longer spent precious time hunting for the right pieces, and Daddy no longer dressed the children in off-season, ill-fitting clothes.
How it works: as I take clothes out of the dryer, or go
through closets for already put away clothes, I match the outfits and fold them
together. Since I only do Mon-Fri, I have all weekend to get it together. If I
am washing clothes during the week, I will fold the outfits I want and separate
them, and the kids put the rest of the clothes away. This way, when the
organizer is emptied on Friday mornings, I have most everything ready to fill
it for the next week. You could do it all Sunday night, or two weeks at a time,
or whatever works for you. As long as everything is ready to go Monday morning,
you can’t go wrong.
Now enjoy your morning cup of coffee just a little bit
longer, the hard part is done!
Items Used:
Scotch Super Thin Waterproof Vinyl Plastic Colored Tape, .75-Inch by 125-Inch, 5-Pack
Basic White Stacking Bins - 3-pack - 12" X 9" X 5"
Sharpie Fine Point Permanent Markers, 12 Colored Markers(30072)
Items Used:
Scotch Super Thin Waterproof Vinyl Plastic Colored Tape, .75-Inch by 125-Inch, 5-Pack
Basic White Stacking Bins - 3-pack - 12" X 9" X 5"
Sharpie Fine Point Permanent Markers, 12 Colored Markers(30072)
Monday, January 28, 2013
One Week Challenge!
I have a fairly slow week planned, so I thought I would take this opportunity to really get something done around the house. I have no major commitments until next Monday, so I have 7 days to really do some damage around here. There are numerous things I've been putting on, and now I WILL get them done!
Step 1. Make a list. This part I'm particularly awesome at. So awesome, in fact, that I usually spend all my time making the perfect list and never actually accomplish anything. I need a list of all the chores to be done, probably organized according to priority and time commitment. Maybe color coded. Or alphabetized! But I digress...
I know off hand that I need to vacuum the stairs, they're still glittery from Christmas decorations.
I also really need to clean the microwave. Husband hasn't learned to cover food yet, and it's ick.
I desperately need to clean out and organize my desk again. This seems to be a monthly chore.
I should probably get the bookshelf reorganized, before it collapses from the uneven weight.
I can see numerous handprints on the kitchen windows, I should probably clean that.
I really need to clean out the pantry, it's been a while since it had an overhaul.
I would like to get all the laundry done and put away, but let's be serious. I'll settle for a third of it.
I need to get all the bedding washed and put back where it goes...the kids made a fort over the weekend and now everything is a mess.
So, that's eight things. I have seven days. But the laundry will probably take the entire week to sift through, because my dryer is ancient and takes a couple hours, slowing down the process. So this week I will tackle one chore a day, and three loads of laundry a day. Hopefully by next week I can see my bedroom floor!
Now, how does one vacuum stairs? I've never done it alone, always with a partner. But Husband is not likely to be around, nor help even if he is here. I would like to get it done before Big Kid comes home from school, but I should probably make lunch first. You can see how this usually goes...
**I managed to get everything done, except vacuum the stairs. I vacuumed the top half I could easily reach, and the bottom stairs I could easily reach, but the middle stairs still look pretty rough. I took a broom and swept everything down, so I could reach it, but there's still glitter I couldn't get up. **
Step 1. Make a list. This part I'm particularly awesome at. So awesome, in fact, that I usually spend all my time making the perfect list and never actually accomplish anything. I need a list of all the chores to be done, probably organized according to priority and time commitment. Maybe color coded. Or alphabetized! But I digress...
I know off hand that I need to vacuum the stairs, they're still glittery from Christmas decorations.
I also really need to clean the microwave. Husband hasn't learned to cover food yet, and it's ick.
I desperately need to clean out and organize my desk again. This seems to be a monthly chore.
I should probably get the bookshelf reorganized, before it collapses from the uneven weight.
I can see numerous handprints on the kitchen windows, I should probably clean that.
I really need to clean out the pantry, it's been a while since it had an overhaul.
I would like to get all the laundry done and put away, but let's be serious. I'll settle for a third of it.
I need to get all the bedding washed and put back where it goes...the kids made a fort over the weekend and now everything is a mess.
So, that's eight things. I have seven days. But the laundry will probably take the entire week to sift through, because my dryer is ancient and takes a couple hours, slowing down the process. So this week I will tackle one chore a day, and three loads of laundry a day. Hopefully by next week I can see my bedroom floor!
Now, how does one vacuum stairs? I've never done it alone, always with a partner. But Husband is not likely to be around, nor help even if he is here. I would like to get it done before Big Kid comes home from school, but I should probably make lunch first. You can see how this usually goes...
**I managed to get everything done, except vacuum the stairs. I vacuumed the top half I could easily reach, and the bottom stairs I could easily reach, but the middle stairs still look pretty rough. I took a broom and swept everything down, so I could reach it, but there's still glitter I couldn't get up. **
Subscribe to:
Posts (Atom)