Showing posts with label cleaning. Show all posts

Monday, August 3, 2015

How To Clean Kitchen Tile Grout

Until I moved into this house, I had no experience with tile floors. I had bathroom tiles, but they were always sealed and easy to clean. This new flooring presented a very big cleaning challenge: keeping the grout looking nice.


I've tried a multitude of cleaners, both commercial and homemade products. I'd even tried using straight bleach to get the grout back to its original color! But nothing seemed to work. I was resigned to scrubbing it by hand with rags and special brushes, and never truly getting it clean.

Until, on a whim, I decided to try toilet bowl cleaner. I don't know why- I was desperate. And it worked! It was wonderful! It cut my cleaning time in half and did a much better job than I ever had. I'm a true believer now, so I'll share with you how I do it.

I've tried several different types and brands of toilet bowl cleaners, and by far the best has been the Target brand generic cleaner.


The process is pretty simple. Squirt the cleaner directly into the grout. If you get some on the tiles, it's fine, but the floor will be slick until cleaned off, so be careful.


Cover all the grout you wish to clean. I don't have the patience to do my entire kitchen at one time, so I split it up into sections and work on it over a few days. I like to leave the cleaner on for at least 20 minutes, so I wait until the kids go to bed and get to work. I just cover the grout in the area I'm working on, then go take a shower or put away some laundry for a while.


You can see the cleaner start to bubble as it works out all the dirt. Because the grout is very porous, it holds onto dirt and crumbs. This bubbling really helps dig it all out.


Next, I just take a towel and wipe it off. You'll be amazed at the dirt and grime it picks up!


While the grout is still wet, it will appear darker. But rest assure, it's much cleaner! If you are worried about residue on the floor, or have pets and toddlers who eat off the floor, a quick rinse with a wet rag or sponge mop will clean it up.

Behold, your now clean grout!


Monday, January 19, 2015

Toy Storage

If your kids are anything like mine, toy storage is a never ending problem. You want to keep things organized, the kids don't really care. You want them to put away their own toys, they just want to play and have fun.

I needed a toy storage system that would work for all three of my children. It had to hold dolls and cars and an abundance of Legos. My very anal son and I like for everything to be labeled. My oldest son just needs direct orders as where to put things. And my daughter....well, she's determined to ruin any system I try.

I decided on a combination of baskets and buckets to utilize space  but also sort the toys. As usual, the hardest part was picking out exactly what I wanted at a price I could afford.


I decided big buckets were best for large and odd shaped toys. All blocks, large cars, and stuffed animals went into these large black tubs. I would have used their specific colors, but I could only find black.


Next I needed medium-sized storage bins for toy categories. Dress up, baby dolls and accessories, and play kitchen items went in these white stackable containers. They are sturdy enough when stacked that they are not likely to get tipped over or fall apart, and the kids can easily pull stuff out and shove stuff back in without knocking them down.


With three different ages, the toy selection can vary greatly. I need smaller containers to hold the numerous sets of smaller items. Matchbox cars, army men, Little People, bey blades, and action figures fit perfectly in these stackable bins. Because the front piece and small and the back is hard to see, these bins were labeled on the bottom inside each one.


And finally, the Lego collection. We have our collection split up in several ways. We have boxes downstairs housing completed display sets, generally the 500-1,000 piece sets of buildings, vehicles, or other special projects. We have a display case to sort all the Lego people, and all the Duplo blocks go in the big tub with the other blocks. I needed a place to store the everyday building Legos, mainly bricks and basic building elements. I wanted it to be short and wide, so the kids could easily see inside without dumping the whole tub. This large snapping tote was just the right fit!

All of them fit in the closet nicely, with ample room to move around and clean up. Please ignore the wall art, my little graffiti demon has left hardly a space untouched by her creativity.


This project was a bit more expensive than most of my others, but each bin can also be rearranged or repurposed later as our needs change.

Large Black Tubs: $4 each.....$12
Medium Stacking Bins: $5.....$15
Small Stacking Bins: 3/$5......$10
Labels I Already Had: $0........$0
Total Cost................................$37

Now the kids have no excuse for a dirty room- they know where everything goes and everything has a specific place!

Mornings Are Hard


Mornings Are Hard


Getting children ready in the morning can be a challenge. Add in pets to take care of, parents who have to get ready for work, and differing schedules, and you’ve got a recipe for chaos. Planning ahead is the key to success. Many people choose to pick out their clothing the night before, but I can’t always guarantee I will be home at a decent time, or remember to do it on hectic nights, so I do the entire week at once. It has made mornings so much easier!

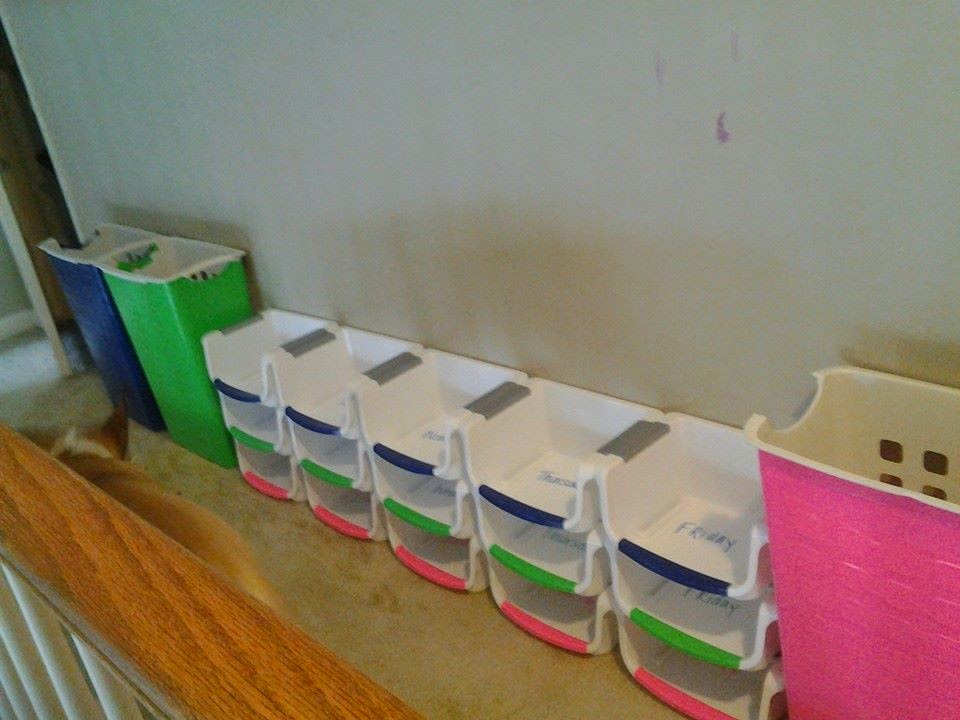
First, I set up a weekly organizer. Finding the right sizes, colors and quantities were the hardest part of this. I ended up using these stacking organizers I found in the kitchen section at Wal-Mart. They came 3 in a pack for about $5, so they were affordable enough to stock up on. I chose to do only kids’ clothing first, so I needed 15 (3 kids, 5 days). I opted not to do weekend outfits as we rarely leave the house on weekends. Since I could only find white bins, I needed to color code them myself. I used a roll of duct tape in each of their colors and just put a strip on the front. It needed to be visible when the containers were full, but it wasn’t necessary to cover the entire bin. I used the leftover tape to identify laundry baskets and other containers, but more on that later.


On the inside of each bin, I wrote the day of the week. It only had to be visible when filling the containers, so I just wrote it with a marker inside.
daily outfit organizer


I then stacked them according to height, and lined them up for the week. This made it easier for my youngest to figure out which one to grab, since she was still learning the days of the week. Everyone grabbed from the same stack on the same day.

In each bin, I placed socks, underwear, pants, shirt, and matching accessories if needed (bow, belt, etc.). Everything they needed was ready to go.


weekly outfit organizer

We have our shoes in a separate organizer, but you could include them in a weekly clothing organizer if you wished. We no longer spent precious time hunting for the right pieces, and Daddy no longer dressed the children in off-season, ill-fitting clothes.

How it works: as I take clothes out of the dryer, or go through closets for already put away clothes, I match the outfits and fold them together. Since I only do Mon-Fri, I have all weekend to get it together. If I am washing clothes during the week, I will fold the outfits I want and separate them, and the kids put the rest of the clothes away. This way, when the organizer is emptied on Friday mornings, I have most everything ready to fill it for the next week. You could do it all Sunday night, or two weeks at a time, or whatever works for you. As long as everything is ready to go Monday morning, you can’t go wrong.

Monday, January 28, 2013

One Week Challenge!

I have a fairly slow week planned, so I thought I would take this opportunity to really get something done around the house. I have no major commitments until next Monday, so I have 7 days to really do some damage around here. There are numerous things I've been putting on, and now I WILL get them done!

Step 1. Make a list. This part I'm particularly awesome at. So awesome, in fact, that I usually spend all my time making the perfect list and never actually accomplish anything. I need a list of all the chores to be done, probably organized according to priority and time commitment. Maybe color coded. Or alphabetized! But I digress...

I know off hand that I need to vacuum the stairs, they're still glittery from Christmas decorations.
I also really need to clean the microwave. Husband hasn't learned to cover food yet, and it's ick.
I desperately need to clean out and organize my desk again. This seems to be a monthly chore.
I should probably get the bookshelf reorganized, before it collapses from the uneven weight.
I can see numerous handprints on the kitchen windows, I should probably clean that.
I really need to clean out the pantry, it's been a while since it had an overhaul.
I would like to get all the laundry done and put away, but let's be serious. I'll settle for a third of it.
I need to get all the bedding washed and put back where it goes...the kids made a fort over the weekend and now everything is a mess.

So, that's eight things. I have seven days. But the laundry will probably take the entire week to sift through, because my dryer is ancient and takes a couple hours, slowing down the process. So this week I will tackle one chore a day, and three loads of laundry a day. Hopefully by next week I can see my bedroom floor!

Now, how does one vacuum stairs? I've never done it alone, always with a partner. But Husband is not likely to be around, nor help even if he is here. I would like to get it done before Big Kid comes home from school, but I should probably make lunch first. You can see how this usually goes...


**I managed to get everything done, except vacuum the stairs.  I vacuumed the top half I could easily reach, and the bottom stairs I could easily reach, but the middle stairs still look pretty rough. I took a broom and swept everything down, so I could reach it, but there's still glitter I couldn't get up. **

Awesome Mommy Blogs

I come across blogs all day long, some of them funny, some of them sad. But then I'll find one that just grabs me and pulls me right in. These are a few of my top favorite blogs:


Cleaning Blogs

A Slob Comes Clean
Clean Mama
Happy Cleaning

Organizing Blogs

I Heart Organizing
Organizing Junkie
Creative Organizing

Homeschooling Blogs

Confessions of A Homeschooler
Alasandra's Homeschool
The Thinking Mother

SAHM Blogs

The Unexpected SAHM
Confessions of A Stay-At-Home-Mom
The Floundering SAHM
Musings From A SAHM

Funny Blogs

Let Me Start By Saying
Hot Mess Mom
Not Your Average Mom
Peanut Butter Hair

Working Mom Blogs

Crazy Working Mom
Jes Delights
Drama Free Mama

Crafty Blogs

The Crafty Blog Stalker
One Crafty Mother
Scattered Thoughts of A Crafty Mom

Wednesday, December 5, 2012

Household Notebook

As I mentioned earlier, a Household Notebook can be a life saver! It can contain everything from meal plans, to budgets, to chore lists, even calendars. It is your tool to keep your house running smoothly.  You can customize it to include whatever you would like, and toss the stuff that doesn't apply to you. I've included several printable and downloadable worksheets, several are the same form just in different format. So find what you like best. If you have suggestions for other forms not included on the list, feel free to share in the comments. I recommend, at the least, a Menu Planner, Chore Chart, Calendar, Budget, and Phone Number List. If you have babysitters on occasion, there are lists which include family information, routines, and emergency contact lists. If you are wanting to get your finances in order, there are several budget and tracking worksheets. If you would like to try meal planning or freezer cooking, or perhaps you regularly do both, there are lists to help with that as well. The important thing is to make it work for YOU. I keep a diet tracker in mine, to track allergic reactions with my kids when we can't quite narrow down the cause. I keep a list of websites and passwords, so my husband can quit calling me every ten minutes. I keep a Pricebook of my favorite stores, so when I do my meal planning and grocery list, I know exactly what it will cost. There are countless options, and it's always a work in progress. You can add it to it later. Pinterest has several ideas (of course!) for how to organize and decorate your household notebook. The possibilities are endless!

Daily To Do List

Master To Do List
Daily Planner
Weekly Planner
Daily Do-It Checklist

Daily Cleaning List
Shopping List

Weekly Menu Planner
Weekly Menu Planner with List
Monthly Menu Planner
Post-It Planner


Pricebook
Freezer Inventory
Pantry Inventory
Recipes to Try

Daily Diet Tracker
First Aid Checklist
Pre-Travel Checklist

Birthday Calendar
Emergency Information
Family Yellow Pages
Important Phone Numbers
Restaurant Directory

Budget Worksheet
Monthly Spending Worksheet
Yearly Spending Worksheet
Debt Load Worksheet
Financial Goals Worksheet
Net Worth Worksheet
One Income Worksheet

Stockpile List
Master Pantry List
Home Inventory
Home Maintenance Checklist
Car Maintenance Checklist

Chore Chart 1
Chore Chart 2
Chore Chart 3
Chore Chart 4
Chore Chart 5
Chore Chart 6
Chore Chart 7

Holiday Spending Worksheet
Holiday Gift Worksheet
Babysitter Checklist 1

Child Chore Pack
Freezer Cooking Pack
Full Menu Planner Pack

Babysitter Checklist 2
Babysitter Checklist 3
Babysitter Checklist 4

Part 2: Keeping it Clean!


Part 2: Keeping it Clean!

It’s a daily struggle for moms everywhere. You work your tail off to clean the house, and in a few hours it’s messy again. Here is a list of odd tips to keep you from spending all day cleaning the same things you cleaned yesterday.

Daily Bathroom Cleanup
-Keep a box of baking soda and a toothbrush in the shower. When you put your conditioner in your hair, let it sit for two minutes. This will help your conditioner work better, and give you two minutes to work. Sprinkle the baking soda on the edges of the shower or tub, and scrub with the toothbrush. This keeps mildew and mold from building up, and only takes a minute. You don’t have to do it every day, but a few times a week will save you from a scrub-a-thon later. On the days you don’t do it, use that 2 minutes to shave your legs or use a good exfoliating treatment on your skin. The baking soda will get into tiny crevices, rinses clean, and will help remove odors.

-Let the kids make bathtub volcanoes. My kids love doing this, and it cuts down on my cleaning time. Give them a small bowl of baking soda and a spray bottle of vinegar. If it finds its way into little mouths, it won’t hurt them. Have them sprinkle the baking soda all over the tub surface, then let them spray it all down with vinegar and watch the bubbling action. This will clean out textured surfaces and superficial scratches, leave a sparkling clean, and the vinegar will disinfect it. This is a good time to squeeze in a science lesson, teach cause and effect, or just sit back while they do the dirty work. Rinse with warm water and you’re done!

-If your kids are like mine, getting them to put dirty laundry and wet towels in the hamper is a daily battle. If you give them each their own basket, they are more likely to put clothes where they belong. We have baskets lined up in the hallway, each with a child’s name on it. If it doesn’t go in the basket, it doesn’t get washed. For older kids, they understand if their favorite shirt didn’t get washed, they can’t wear it. For toddlers, teaching them early is key to a lifetime a good habits. Show them where their things go (they can usually recognize their name on the basket, even if they can’t “read”) and let them help with the washing when the time comes. This also saves you from sorting through laundry later.

Kitchen Clean Up
-Keep a mop bucket under the sink, a stack of wash rags or dish cloths, and a spray bottle of vinegar. Any time there is a small spill or mess to clean up, everything you need is right at your fingertips! When you are done, the wet rags go in the bucket. This will save you from hunting down dish rags, and when the bucket fills up you can dump the entire thing in the washer at once. Every night after dinner, my kids grab a spray bottle and a rag and we work together to clean up. One wipes off the table, another gets the stove, one gets splatters off the walls and windows…. it’s a family event. Cleanup is done in ten minutes, they enjoy helping, and they know if they make a mess, they have to clean it up.

-Have a Swiffer race! When it comes to children, competition breeds productivity. I have two Swiffers, so they can race each other. Sometimes we see who can get it done the fastest, sometimes we see who can get their cloth the dirtiest, and sometimes we divide the room and see who can get the floor the cleanest. We do this with dry cloths in the family room and wet cloths in the kitchen. (Side Tip: You don’t have to buy expensive Swiffer cloths. A rag fits nicely around the base and can be reused)

-If you don’t have a dishwasher, or you have a large family and your dishwasher just can’t hold it all, keep a Rubbermaid tote under the sink, in the pantry, or stashed in a nearby cabinet. Fill with soap and water, and drop in dishes you don’t have time to clean right away. This is especially great if you have company coming over. The dishes are no longer piled in the sink, which leaves the kitchen looking cleaner, and lets the dishes soak so food isn’t dried on.

Tackling the Family Room
-Get a storage ottoman (we got two smaller ones at Target for about $20 each). This is a great place to stash stray toys, extra pillows and blankets. Once or twice a week, I haul it upstairs and dump all the toys back into the toy box. This keeps the living room picked up and looking nice. If the kids want to watch a movie or play a game, they have to get all the toys put in the ottomans first. Suddenly cleaning up isn’t so hard, and it’s done in just a few minutes. It’s also easy to pick u during nap time without disturbing them.

-Make a game out of cleaning. See who can get their dust rag the dirtiest with Dust Bunny Battle. Race to clean off the coffee table and bookshelves in Dirty Rag Race. Or label where everything should go and test their reading skills. We have tiny stickers placed on the shelves and bins labeling where everything goes (remote, books, toys, phone, etc). For a less permanent option, scotch tape labeled flash cards to each surface, and you can quickly peel them off when you expect company.

-Velcro remotes, phones, video game controllers and baskets to their respective homes. A roll of Velcro stripping costs about $2 at any craft store, dollar store or big-box store like Wal-Mart and Target. Place a small strip on the remote or other item, and the opposite side of the Velcro strip to its home. The remote will never be lost again!

Organizing the Home
-Bins, baskets, buckets and boxes. These are your new best friend. You can get canvas bins at the Dollar Store, or nicer looking baskets at home improvement stores like Lowe’s. When everything has a place, it’s easier to clean up. Baskets look nice on a shelf to hold odds and ends, like playing cards or game pieces. This also teaches kids to sort and properly put away their things. A large pink box can hold baby dolls and accessories, an under-the-bed basket can house thousands of Legos, and decorative bins can store small blankets and extra bedding for quick midnight changes and more drawer and closet space. My closets are filled with bins of every color and size. From first aid kits, to each child’s medicines, to hair accessories, they keep things organized, and everyone has their own place. This is great for large families or families with large age gaps in children. Infant medicine goes in one bin, children’s medicine in another, and adult medicine in a third. So when a child is sick in the middle of the night, there’s no hunting for the right bottle and dose. (Side Tip: Highlight on the bottle your child’s dose, and draw a line on the syringe or medicine cup where the dose is. This helps at 3am dosings and when Daddy is in charge. If the child’s age/dose changes, the medicine is likely expired and should be properly disposed of.)

-Chore schedules and charts can be a life saver. You can do one large chore chart, color coded for each person, or individual charts for each child. We have a little of both. My oldest kids have their own chore charts and my youngest ones are included in the family chart. I have a list of ten chores, with five every day, simple tasks (bathe, do homework, clean room, brush teeth, comb hair) and five household chores (sweep the kitchen, take out the trash, unload the dishwasher, clear the dinner table, and help someone else). These can be printed out, written on a dry erase board, or a poster board with stickers. There are numerous ways to approach this: drawing chores from a hat, rotating weekly chores, even rotating which room in the house to clean up. No matter how you approach it, it’s important to teach kids to help, and to start them early.

-A household notebook is a helpful way to keep track of everything. We’ll go into more detail on this later, but keeping household information in one place is an easy way to remember what’s going on and quickly access the information needed.
-Laundry schedules can help you tackle Laundry Mountain. You can divvy up laundry in whatever way works best for you. Monday, Child A; Tuesday, Child B; Wednesday, Child C; Thursday, Mommy; Friday, Daddy; Saturday, all bedding; Sunday, towels. Or you can do lights, darks, whites, etc. If you don’t have daily access to a washing machine, or perhaps do all of your laundry on the weekend, you can do it by time frame (morning, Mommy; afternoon, baby; etc.)Having a laundry schedule can help you keep up with whose clothes are in the dryer and help get them sorted and put away. Older kids can put away their own laundry.

     
     Cleaning doesn’t have to be a once a week marathon, nor does it need to be a daily battle to keep things looking neat and tidy. Many hands make light work, so get the kids involved whenever you can. Break up large chores over several days, and have a schedule to keep you on track.

Deep Cleaning for Dummies


Deep Cleaning: We've all been there, trying to clean the house, when you see something needs to be done, but you don't quite know how to do it. Stain on the couch? Spill on the carpet? Kitchen smells a little funny? So you call your mom, post on Facebook, or do a little Googling. You get twenty different answers, and you're not sure what to try! This is a list of tried-and-true methods for tackling those odd jobs, and without buying expensive cleaners.

Baseboards: Take a Swiffer (wet or dry) and run it along the baseboards. Not just the bottom edge by the floor, but the top (by the wall) and the entire side. You don’t have to spend hours on your hands and knees scrubbing, they usually need only light dusting.

Blinds: For vinyl and plastic blinds, you can soak them in the tub. Just pull off at the top and drop in the tub as is. A little bleach will whiten them up, but a simple vinegar-water mix will disinfect and clean without leaving a residue. For heavy stains or grease (such as windows above a stove or sink), a simple wipe down with a rag after soaking should do the trick. To rinse, just drain the tub and turn on the shower. Lay on a towel to pat dry, then rehang. Do only one room at a time, so you know where they go and don’t end up with a house full of bare windows.

Carpets: For general cleaning, vacuuming usually will suffice. If a spill occurs, clean it as soon as possible. Blot it, don’t wipe, to avoid spreading the stain. For spills that leave a stain, mix 1 tbsp. mild laundry detergent, 1 tbsp. vinegar, and 1 quart of warm water.  Use a clean towel, blow on the spot, working from the outside in (again, to avoid spreading the stain).

Copper Bottom Pots and Pans
: Take ½ a lemon, sprinkle with salt, and scrub gently to remove tarnish without damaging the finish.
Silver Candlesticks: To remove melted on candle wax without ruining the finish, freeze the candlesticks and gently peel off the wax. If you cannot get the edge to peel, cover a wooden craft stick or cuticle remover with a soft cloth and scrape the wax off.

Metal Faucet: Have buildup on your faucet? Rub with a lemon to remove any tarnish, water spots and other buildup.
Silver: to gently polish silver, rub with toothpaste. Be sure to the old fashioned white paste, not gel.
Rusty Sink: To remove rust and tarnish from sinks, brass, copper, and stainless steel, mix lemon juice and salt to form a paste. Scrub it on and rinse off.
Mineral Deposits: For sinks and faucets with mineral deposits, sponge on lemon juice, let it soak, then scrub off.
Garbage Disposal: To remove unpleasant odors from lingering in the garbage disposal, toss in a lemon and grind it.
Dishwasher: To remove soap buildup, rub chrome with a lemon. To disinfect and remove soap buildup from the internal parts, run a hot cycle with vinegar in the soap dispenser.
Stove Top and Oven Spills: Mix lemon juice, water and baking soda to form a paste. Apply to spills and let it soak for 15 minutes. Scrub off and rinse.
Windows: To clean and disinfect windows (doggy slobber and toddler nose prints are common), mix 2 tbsp. lemon juice, ½ cup white vinegar, 1 quart of warm water and clean as usual.
Homemade Air Freshener: Boil several pieces of lemon or oranges, add 1 teaspoon each of whole cloves and rosemary leaves.

Kitchen Air: To clean air in the kitchen (burnt popcorn, last night’s fish), heat the oven to 300*F. Place whole lemon on center rack. “Cook” for 15 minutes, with oven door slightly ajar. (Be sure to keep a close eye on children and pets in the area)

Wooden Cutting Board: Rub with lemon after normal cleaning to remove onion, garlic and fish smells.

Microwave: Fill a glass bowl with warm water and piece of orange or lemon. Cook for 2-3 minutes. This will not only remove the smells from the microwave, but also loosens any burnt on food. Simply wipe with a damp towel to remove baked on crud inside.

Vinyl/Linoleum: To remove scuff marks, rub on toothpaste and wipe with a damp cloth. Add baking soda for more scrubbing power. (Again, use the old fashioned white paste, not the gel toothpaste)
Potty Stains: Anybody with pets and toddlers will occasionally get a potty stain on the carpet. Work shaving cream into the stain, rinse, and blot dry. Also helps remove odors.
Vinyl Furniture: Remove water marks by applying toothpaste with a damp cloth.
Dusting Grooves: For hard to clean grooves, such as details in a table leg, dip a Q-tip in furniture polish.
Glass Tables: For superficial scratches on glass, apply toothpaste, let it dry, then wipe with a soft, dry cloth.
Piano Keys: To remove stains from piano keys, apply toothpaste with a soft toothbrush, and wipe clean with a damp cloth.

Upholstery: To remove stains from upholstery, spray on a small amount of shaving cream, work in with fingers or soft brush, sponge off excess and blot dry.
Jagged Wicker: To polish and soften jagged wicker edges, apply clear nail polish.
Dirty Vases: To clean inside impossibly thin vases, fill with warm water and drop in two antacid tablets.
Toilet Bowl: Vinegar can remove and prevent stains, as well as disinfects. Add baking soda to scrub tough stains
Oven Vents: Apply vinegar with a small toothbrush to remove grease and odors.